Jun
14
2026
--

The Failover Brownout: Rethinking High Availability in MySQL Group Replication

It is time to talk again about Flow control and group replication. This time with a special eye on the use of Group Replication in the Kubernetes context. In this article we will dig a bit on how it works and what are the various side effects. 


The problem

Recently I was refining the calculation I use in the MySQL calculator for Operator given I was constantly encountering a very serious problem with the Percona Server Operator.

The problem is that when the deployment was/is serving a high level of traffic, it will, no matter what, end up in getting OMMKill by the K8 system. 

This because the pod was gradually consuming more and more memory, reaching the memory limit set in the CR specification. 


Now let me clarify a few things, to get straight to the facts.

Kubernetes itself does not OOMKill a pod for hitting its memory limit, the mechanism works as described below with mention on how Working Set Size (WSS) is calculated, and how OOMKills are triggered, and in the resource sections, the links to the official documentation and source code.


1. The Reality of OOMKills vs. Kubelet Evictions

It is crucial to distinguish between what the Linux kernel does and what Kubernetes does:

  • OOMKilled (Exit Code 137): This is executed entirely by the Linux kernel’s OOM Killer, not Kubernetes. When we set a memory limit in our Pod spec, Kubernetes translates that into a Linux cgroup constraint (memory.limit_in_bytes for cgroups v1, or memory.max for cgroups v2). If our container attempts to allocate more memory than this hard limit, and the kernel cannot reclaim any page cache (like inactive files), the kernel directly intervenes and terminates the process.
  • Node-Pressure Evictions: This is where Kubernetes actively observes memory. The kubelet monitors the working_set_bytes metric to protect the node from running out of memory. If the node’s memory drops below an eviction threshold, Kubernetes will actively evict pods to prevent the kernel from initiating a system-wide OOM kill.

2. How Working Set Size (WSS) is Calculated for the container

Kubernetes monitors container memory via cAdvisor, which is integrated directly into the kubelet. cAdvisor calculates the Working Set Size by taking the total memory usage and subtracting the inactive file cache (memory that the kernel can easily reclaim if it faces memory pressure).

Because active file caches and anonymous memory (like our application’s heap) cannot be easily evicted, this working set metric is the most accurate representation of the memory your container is forcing the system to hold.


The Calculation & cgroups Evolution The core mathematical calculation is Memory Usage – Inactive File Cache, but how cAdvisor fetches this data from the Linux kernel depends entirely on your node’s cgroup version. Modern cAdvisor relies heavily on the opencontainers/runc/libcontainer library to read these raw cgroup files:

  • cgroups v1: cAdvisor starts with the raw usage from memory.usage_in_bytes and subtracts the reclaimable cache found under the total_inactive_file key.
  • cgroups v2 (Unified): cAdvisor starts with the raw usage from memory.current and subtracts the reclaimable cache found under the inactive_file key.


The Underlying Code Logic While older versions used a static setMemoryStats function, modern Kubernetes branches handle this dynamically. The logic executes the following flow before reporting back to the kubelet:

  1. Detects Version: It identifies whether the node runs cgroups v1 or v2 to determine the correct inactive file key name.
  2. Fetch Usage: It pulls the raw memory usage from the container.
  3. Subtract Cache: It looks up the inactive file value and safely subtracts it from the usage (including a safeguard to ensure the working set never drops below zero).
  4. Report Metric: It sets this final calculated value as container_memory_working_set_bytes, which the kubelet then uses to decide if the node is under memory pressure.

Back to us 

At the end the point is that if our pod reaches the limit and we ARE NOT using the new swap feature existing in Kubernetes, our pod will be brutally killed, and in 99% of the cases our production will suffer a lot. !Ops spoiler!


To clearly understand what was causing the issue about this memory consumption and having my calculator fail, I started to collect the information about the memory usage in MySQL itself.


SELECT EVENT_NAME,CURRENT_NUMBER_OF_BYTES_USED / 1024 / 1024 AS current_usage_mb FROM performance_schema.memory_summary_global_by_event_name WHERE EVENT_NAME like ‘memory/%’ and EVENT_NAME not like ‘memory/performance%’  order by current_usage_mb desc limit 25;

Which will give you and output like this:

+---------------------------------------+------------------+
| EVENT_NAME                            | current_usage_mb |
+---------------------------------------+------------------+
| memory/innodb/buf_buf_pool            |   46398.92578125 |
| memory/group_rpl/GCS_XCom::xcom_cache |    1066.66179943 |
| memory/group_rpl/certification_info   |      92.45250702 |
| memory/innodb/log_buffer_memory       |      64.00096130 |
| memory/sql/TABLE                      |      49.90627003 |
| memory/innodb/memory                  |      34.68734741 |
| memory/innodb/ut0link_buf             |      24.00006104 |
| memory/innodb/lock0lock               |      21.40064240 |
| memory/mysqld_openssl/openssl_malloc  |       9.51009655 |
| memory/innodb/read0read               |       8.19496155 |
| memory/mysys/KEY_CACHE                |       8.00215149 |
| memory/innodb/sync0arr                |       7.03147125 |
| memory/innodb/ha_innodb               |       6.87006950 |
| memory/innodb/lock_sys                |       5.25009155 |
| memory/sql/log_sink_pfs               |       5.00003052 |
| memory/innodb/ut0pool                 |       4.00017548 |
| memory/sql/dd::objects                |       2.83031464 |
| memory/innodb/std                     |       2.72618866 |
| memory/innodb/os0file                 |       2.63054657 |
| memory/innodb/os0event                |       2.34302521 |
| memory/sql/TABLE_SHARE::mem_root      |       2.31734467 |
| memory/innodb/trx0trx                 |       2.22647858 |
| memory/temptable/physical_ram         |       1.00003052 |
| memory/sql/dd::String_type            |       0.94942093 |
| memory/innodb/btr0pcur                |       0.89743423 |
+---------------------------------------+------------------+


Plus I used PMM to collect memory information 
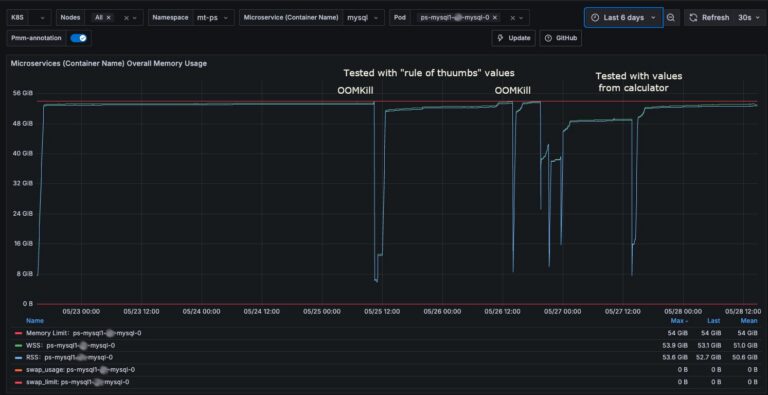
To simulate the load I used the sysbench-tpcc (tpc-c derivate test) variant and run the tests simulating a load of 1024 threads against a cluster based on machine with 16 Core and 64Gb volumes ~3k IOPS, so not gigantic but not small. 


The finding was almost immediate:

+---------------------------------------+------------------+
| EVENT_NAME                            | current_usage_mb |
+---------------------------------------+------------------+
| memory/innodb/buf_buf_pool            |   46398.92578125 |
| memory/group_rpl/certification_info   |    1431.67934418 | <constantly increasing
| memory/group_rpl/GCS_XCom::xcom_cache |    1066.63542366 |
| memory/sql/Gtid_set::Interval_chunk   |      95.52413940 |
| memory/innodb/log_buffer_memory       |      64.00096130 |
| memory/sql/TABLE                      |      48.17613125 |
| memory/innodb/memory                  |      35.08897400 |
| memory/innodb/ut0link_buf             |      24.00006104 |
| memory/innodb/lock0lock               |      21.40064240 |
| memory/innodb/read0read               |      14.86782837 |
| memory/mysqld_openssl/openssl_malloc  |      12.05916119 |
| memory/mysys/KEY_CACHE                |       8.00215149 |
| memory/innodb/sync0arr                |       7.03147125 |
| memory/innodb/ha_innodb               |       6.84074974 |
| memory/innodb/lock_sys                |       5.25009155 |
| memory/sql/log_sink_pfs               |       5.00003052 |
| memory/innodb/ut0pool                 |       4.00017548 |
| memory/sql/dd::objects                |       2.82012177 |
| memory/innodb/std                     |       2.72515869 |
| memory/innodb/os0file                 |       2.63054657 |
| memory/innodb/os0event                |       2.35884857 |
| memory/innodb/trx0trx                 |       2.22647858 |
| memory/sql/TABLE_SHARE::mem_root      |       1.83777618 |
| memory/innodb/trx0undo                |       1.26304626 |
| memory/mysys/lf_node                  |       1.08828735 |
+---------------------------------------+------------------+


Ok then … What is the certification info???

What is group_rpl/certification_info?

In MySQL, memory/group_rpl/certification_info is a Performance Schema memory instrument. It tracks the exact amount of RAM allocated to store the Certification Database (or Certification Info).

In Group Replication, nodes do not lock rows across the network while a transaction is executing. Instead, transactions execute locally and optimistically. When it is time to commit, the transaction undergoes a Certification Process to ensure no other concurrent transaction in the cluster has modified the exact same rows. The certification_info buffer is the in-memory hash map that makes this conflict detection possible.

1. What is it used for?

The certification_info structure acts as a tracking ledger for recently modified rows.

Here is how it works under the hood:

  • The Key-Value Pair: It is fundamentally an in-memory dictionary. The key is the hash of a modified row (extracted from the transaction’s “write set”), and the value is the Global Transaction Identifier (GTID) of the transaction that successfully modified it.
  • Conflict Detection: When a new transaction attempts to commit, it broadcasts its write set and the “snapshot version” of the database it saw when it started. The certifier cross-references the incoming transaction’s write set against the certification_info map.
  • The Decision: If the certification_info shows that a row was modified by a newer GTID that the incoming transaction did not “see” when it started, a conflict is flagged, and the transaction is aborted. If no conflict exists, the transaction is certified, and the certification_info map is updated with the new write set and GTID.

The primary does not hold onto this memory out of stubbornness; it does so because purging that data too early would destroy the cluster’s consistency in the event of a failover.


In Group Replication, garbage collection for the certification_info buffer is not triggered just because a transaction commits on the primary. It is triggered by a concept called the Stable Set. 

Every node in the cluster periodically broadcasts a message to the rest of the group saying, “Here are the GTIDs I have successfully applied to my disk.” The cluster then calculates a global low watermark. This watermark is the highest transaction GTID that every single member of the group has successfully applied. Garbage collection is only allowed to purge write-sets from the certification database that fall below this global watermark.
To note that this purge is a synchronous operation during which writes are forbidden.

2. How the Apply Queue Stalls the Watermark

When a secondary node starts lagging, its applier queue grows. This means the secondary is receiving transactions from the network quickly, but its SQL thread is too slow to actually execute them and commit them to disk.

Because the secondary hasn’t applied these transactions, it cannot report those GTIDs back to the group as “finished.”

  • The lagging secondary’s local watermark stalls.
  • Therefore, the global low watermark for the entire cluster stalls.
  • Because the global watermark hasn’t moved forward, the garbage_collect function on the primary (and all other nodes) says, “I am not allowed to delete any write-sets yet.”
  • As the primary continues to process new writes, the certification_info memory buffer grows continuously.

3. Why the Primary Cannot Purge Early

we might wonder: If the transaction is already committed on the primary, why does the primary care if the secondary has applied it? Why not just drop the write-set from its own memory?

The answer comes down to Failover Safety and Distributed Conflict Detection. GR is a shared-nothing, decentralized architecture. Even if you are running in Single-Primary  mode (keep this in mind will be important later), the underlying engine uses the exact same logic as Multi-Primary mode. 

Here is why the primary is forbidden from purging that data:

  • The Failover Scenario: Imagine our primary node crashes right now. The lagging secondary (which still has a massive apply queue) is immediately elected as the new primary.
  • The Conflict Risk: As the new primary, it starts accepting new writes from your application. However, it still has thousands of old transactions in its applier queue that it hasn’t written to disk yet!
  • The Necessity of the Buffer: When a new write comes in, the new primary must check if that write conflicts with any of the pending transactions in its apply queue. It does this by checking the certification_info map. If the old primary had purged the global certification data early, the new primary wouldn’t have the write-sets for those pending transactions. It would blindly accept the new write, causing a massive data conflict and breaking the replication group entirely.

Fine Marco, then what is the effect of this?


Well, drums roll …

… When a secondary node is elected as the new primary during a failover, it does not immediately open the floodgates to new writes. It keeps its super_read_only variable set to ON until it has completely drained its local apply queue of all transactions that were certified prior to the election.

This is an intentional design choice to guarantee that the new primary’s state is completely consistent with the old primary before it starts accepting new data.


4. Immediate Write Rejections (No Built-in Queuing)

The most critical impact to understand is that the new primary does not queue or pause new incoming writes while it catches up. It outright rejects them.

If our application or proxy routes a COMMIT, INSERT, UPDATE, or DELETE to the new primary while it is still processing the old queue, MySQL will immediately throw an error back to the client:

ERROR 1290 (HY000): The MySQL server is running with the –super-read-only option so it cannot execute this statement

5. The “Brownout” Window (Write Outage)

Because of this behavior, a failover in MySQL Group Replication does not instantly restore write availability. Our cluster experiences a “brownout”, a period where reads might succeed, but writes are entirely blocked.

The duration of this write outage is directly proportional to the size of the apply queue.

  • If the secondary was fully caught up, write availability is restored in milliseconds.
  • If the secondary was lagging by 50 minutes, your application will suffer a 50 minute write outage while the node applies the backlog.

6. Impact on Proxies (e.g., MySQL Router or ProxySQL)

If we are using a proxy layer to route your database traffic, the apply queue dictates how the proxy behaves during the transition:

  • MySQL Router: It continuously monitors the cluster topology and the super_read_only flag. Even though the node has technically been elected primary, Router will not open the read-write port to it until the apply queue drains and super_read_only flips to OFF. Depending on your application timeouts, client connections will either hang waiting for a writable connection or fail completely.
  • ProxySQL: Similar to Router, if it is configured to check for the read_only state, it will temporarily quarantine the new primary from the write hostgroup.
  • HAProxy (in Operator): Monitor both Primary state and read_only state, but it expose the Primary to writes causing the application to fail (bug we need to fix)  

7. Read Traffic and Stale Data

During this catch-up phase, the node will accept incoming SELECT queries (since it is still a valid database). However, because it is actively churning through the old primary’s backlog, the data being read is temporarily stale.

If your application reads a row that is sitting in the apply queue but hasn’t been committed to disk yet, it will get the old version of that row.

Why Flow Control is Critical

Because a large apply queue turns a seamless failover into a severe, application-breaking write outage, Group Replication includes the Flow Control feature.

Flow Control monitors the size of the apply queues across all secondaries. If a secondary starts lagging too far behind, Flow Control should actively throttle the write throughput on the current primary to allow the lagging node to catch up. It is essentially a trade-off: we accept a slight performance hit during normal operations to guarantee that your database recovers almost instantly during a failover.

However, this is not what really happens.

1. It is Reactive, Not Proactive (The Polling Blind Spot)

Flow control does not intercept and evaluate every single transaction in real-time. Instead, it relies on a periodic polling interval governed by group_replication_flow_control_period (which defaults to 1 second).

Once a second, the cluster checks the size of the apply queues and the certifier queues.

  • The Vulnerability: If our application generates a massive spike of 50,000 writes in 500 milliseconds, the primary will happily accept and certify all of them. Flow control will not even notice the spike until the next 1 second polling interval hits. By the time it decides to apply a throttle, the damage is already done, and the secondary’s queue is already overflowing.

2. The PID Controller’s “Soft Brake” Math

When flow control does decide to throttle, it does not simply freeze the primary. It uses a PID (Proportional-Integral-Derivative) controller algorithm to calculate a “write quota” (the maximum number of transactions the primary is allowed to commit in the next second).

The PID controller is deliberately tuned to be gentle. It wants to gracefully degrade performance rather than cause immediate application timeouts.

  • When the secondary’s queue breaches the group_replication_flow_control_applier_threshold (default 25,000 transactions), the PID controller reduces the primary’s quota incrementally.
  • The Failure Point: If the primary’s incoming write rate is astronomically higher than the secondary’s disk IO capacity, this incremental “step down” in the quota is too slow. The primary is still allowed to write, say, 10,000 transactions per second, while the secondary is only applying 2,000. The queue continues to grow aggressively despite the throttle being “active.”

3. The Concurrency Mismatch (Parallel vs. Serial)

This is often the silent killer that defeats flow control. Flow control makes mathematical assumptions about how fast the secondary should be able to apply transactions based on recent history.

However, the primary node might be executing writes using hundreds of highly concurrent threads. The secondary relies on the parallel applier to keep up. If the incoming workload suddenly includes transactions that cannot be parallelized, such as writes hitting overlapping rows, cascading foreign key updates, or DDL statements, the secondary’s applier instantly drops from executing in parallel down to a single, serialized thread.

When this serialization happens, the secondary’s applier rate plummets instantly. Flow control, which only checks in once a second and adjusts gradually, cannot brake the primary fast enough to compensate for the secondary suddenly dropping to a crawl.

What can we do?

At the moment of writing there are only two things that can be done.

  1. Make Flow control more aggressive
  2. Increase the number of replication appliers


1. Making Flow Control More Aggressive

We can configure Flow Control to be a bit more aggressive. It will still remain a suggestion but a strong one.

How it works (The Configuration):

  • Lower the Threshold: By reducing group_replication_flow_control_applier_threshold (default is 25,000) to something like 1,000 or 500, we force the PID controller to kick in almost immediately when a spike occurs.
  • Remove the Safety Net: By keeping  group_replication_flow_control_min_quota to 0 (default), we remove the minimum write guarantee. If the secondary falls behind, Flow Control is allowed to throttle the primary’s writes down to zero, also if this will never happen.
  • Increase the Sensitivity: We can tweak the PID controller’s math (using the derivative and proportional tuning variables) to react much more aggressively to queue growth.
          group_replication_flow_control_hold_percent=100
          group_replication_flow_control_release_percent=5


The reality check, does it work?:

If the expectation is to have a rigid control over the applier queue on the lagging secondary, then the answer is NO. No matter what, at the moment flow control is not designed to act as we are used to in PXC (Percona Xtradb Cluster), where we have a rigid control of the pending queue also at the cost of delaying the writes. In Group Replication  the Flow Control will never bring the write to 0, the unfortunate aspect is that the mechanism is not enough to keep the queue under control.


2. Increasing Replication Appliers 

To help the secondary chew through the queue faster, we can increase the number of parallel threads it uses to write to disk.

How it works: We can increase the replica_parallel_workers (formerly slave_parallel_workers) setting. GR is exceptionally smart about this. Because of the certification process we discussed earlier, GR already knows exactly which transactions modify which rows. It uses a writeset-based dependency tracker to safely hand off non-conflicting transactions to multiple worker threads simultaneously.
The formula that is normally used to calculate the number of replication workers is to set 2.5 workers for each available core. IE if we have 14000m CPUs in our CR (K8) then we can assign ~35 workers, this is definitely higher than the default value of 4.   

The reality check, does it work?:  Yes, but only if our workload allows it.

  • The Catch – The Serialization Wall: Parallel appliers only work if the transactions do not conflict. If our application has 50 concurrent threads all trying to update the same “inventory count” row, or updating a highly contentious table, those transactions cannot be parallelized. The secondary’s coordinator thread will see the row-level conflicts and force those transactions to wait in line and execute sequentially. We could allocate 128 parallel workers, but 127 of them will sit idle while one thread does all the work.
  • The Catch – Context Switching: More threads do not magically create more disk IOPS. If we set the workers too high (e.g., beyond the physical CPU core count or disk IO capacity), the secondary’s InnoDB engine will spend more time context-switching and fighting over internal mutex locks than actually committing data. In many cases, over-allocating parallel workers actually slows down the apply rate.

Do we have any conclusions?

1. If HA is the goal, enforce Strict Flow Control

If our absolute top priority is High Availability, specifically achieving a near-zero Recovery Time Objective (RTO), we must configure an aggressive flow control.

  • The Logic: Fast failovers require small apply queues. To guarantee a small apply queue, we must strictly throttle the primary the millisecond the secondary starts to lag.
  • The Trade-off: we are protecting the cluster’s failover readiness at the expense of application write latency. If there is a massive write spike, our application will face timeouts and connection errors, but if the primary server suddenly catches fire, our database will recover and elect a new primary almost instantly.

The problem is that Group Replication is not able to act like that today, this is something we eventually need to implement to have better HA.

2. If Performance is the goal, relax Flow Control

If our top priority is keeping the application fast and ensuring COMMIT latencies remain extremely low, we should relax flow control or rely on the generous defaults.

  • The Logic: By relaxing flow control, we allow the primary to run at the absolute maximum speed its local disks and CPU allow. It does not care if the secondaries fall behind. Our application users remain happy and experience zero throttling.
  • The Trade-off: We are accepting severe risks to your HA posture. If the primary crashes while the secondaries have a massive apply queue, we will suffer a long write outage (the brownout) while the new primary catches up. Additionally, we are accepting the risk that the certification_info memory buffer will grow significantly on the primary and eventually have the pod OOMKilled .

3. Is this not what Asynchronous replication with semy-sync offers?


1. The Similarities

If we look purely at how a single transaction flows and how a failover behaves, GR and Semi-Sync look like twins:

  • The Durability Guarantee: Semi-Sync: The primary waits to commit until at least one secondary confirms it has received the transaction and written it to its local Relay Log. 
    • GR: The primary waits to commit until a majority quorum of nodes confirm they have received the transaction, certified it, and written it to their local relay logs.
  • The Failover Delay (The Queue):  In both systems, the secondary receiving the data does not mean the secondary has applied the data to its InnoDB tables.
    • If a crash happens, both systems require the new primary to completely execute its pending queue (Relay Log for Semi-Sync, Apply Queue for GR) before it is safe to accept new writes.

2. The Crucial Differences

If they behave so similarly, why use GR at all?
The differences lie entirely in automation, consensus, and split-brain protection. Semi-Sync is just a data transport mechanism; GR is a full state-machine cluster.

Here is what GR gives you that Semi-Sync does not:

  • Automatic Election and Orchestration:
    • Semi-Sync: If the primary dies, Semi-Sync does nothing. The cluster sits there broken. You must rely on external tools (like Orchestrator or manual DBA intervention) to detect the crash, pick the most up-to-date secondary, wait for its relay log to apply, disable read_only, and re-point the application.
    • GR: The cluster detects the failure natively. The remaining nodes use Paxos consensus to elect a new primary automatically, manage the queue drain natively via the super_read_only flip we discussed, and self-heal.
  • Split-Brain Protection (Network Partitions):
    • Semi-Sync: If our network splits in half, an external failover tool might accidentally promote a secondary while the old primary is still alive and accepting writes. We now have a split-brain, and our data is permanently corrupted.
    • GR: GR enforces strict quorum. If a network split happens, the side of the network with the minority of nodes will automatically fence itself off and refuse all writes. Split-brain is mathematically prevented.
  • The Certification Database:
    • As we established, GR requires the certification map to ensure the new primary doesn’t accept writes that conflict with its unapplied queue. Semi-Sync does not have this; it relies entirely on the external failover tool to guarantee no writes touch the new primary until the relay log is 100% applied.

3. Final observation

If we are using Single-Primary GR with relaxed flow control, we have essentially built a highly-automated, consensus-driven version of Semi-Sync replication. 

We have the exact same apply-queue bottleneck during failover, but we have traded the need for external orchestrator tools for built-in Paxos consensus and native split-brain protection.


Conclusions (for real)

When we run MySQL on a traditional, dedicated Virtual Machine, memory limits are “soft.” If the certification_info database explodes and consumes an extra 10GB of RAM because of the applier lag, the Linux OS might start aggressively swapping inactive pages to disk, but the MySQL process usually survives. Performance degrades, but the database stays online.

In Kubernetes, memory limits are “hard.” As we discussed earlier, Kubernetes enforces pod memory limits via cgroups v2 (memory.max). The Linux kernel’s OOM Killer has no understanding of database quorum, failover states, or apply queues. It only sees math: Working Set Size > memory.max = Terminate Process (Exit Code 137).

The Chain Reaction of Relaxed Flow Control in k8s

If we prioritize “performance” by relaxing Flow Control in a Kubernetes environment, we are essentially setting a ticking time bomb. Here is the chain of events:

  1. The Spike: Our application experiences a massive write spike.
  2. The Queue: The secondary pod’s disk cannot keep up, and its applier queue grows to 1,000,000 transactions.
  3. The Memory Sprawl: Because the queue is large, the global low-watermark stalls. The Primary pod is forbidden from garbage collecting the certification_info map. The in-memory hash map balloons in size.
  4. The Execution: The memory.current metric will reach the memory.max, kernel will trigger the OMMKill process. First action will be to try to free the page.cache related to the process. If the purge is successful and the memory.current is less than memory.max then the process will persist, otherwise the kernel will kill it.
    We can use the WSS metric to predict a successful OMMKill.
    The Primary pod’s Working Set Size (WSS) breaches its Kubernetes memory limit, this is a fair estimate not an absolute value.
  5. The Catastrophe: The Linux OOM Killer instantly assassinates the Primary MySQL process.

Because we tried to avoid a few seconds of write latency by keeping relaxed Flow Control, we inadvertently caused a hard crash of the primary database pod, with long write downtime.

The Architectural Law

Therefore, here is my statement as architectural law for containerized environments: In Kubernetes, High Availability and Pod stability are so intrinsically linked that Flow Control must act as hard as it can to cap the apply queue.

  • We cannot allow unbounded memory growth in a container. The only way to bound certification_info memory is to bound the apply queue.
  • The only way to bound the apply queue is with strict, aggressive Flow Control.
  • Increasing the number of replication appliers helps but is not the conclusive answer.

In a Kubernetes environment, we must tune group_replication_flow_control_applier_threshold to a strict, low number, and accept that during massive traffic spikes, our application will experience write throttling. It is infinitely better for our application’s connection pool to wait 2 seconds for a COMMIT to succeed than for the primary database pod to be violently OOMKilled by the kernel, and have to wait for minutes or hours to recover write capabilities.

Note

Just as a mention this is exactly how Percona Operator with Percona Xtradb Cluster works. To be more specific, PXC and in general solutions based on Galera have a Flow Control mechanism that enforces the queue to be inside hard limits. While this more invasive control may be noticeable at application level, it guarantees that the other nodes are not lagging behind the primary and this is why it is a stronger HA solution in the Kubernetes environment.


Reference

https://github.com/Tusamarco/mysqloperatorcalculator

Managing Resources and OOMKills: Resource Management for Pods and Containers (This page details how memory limits are enforced reactively by the Linux kernel via OOM kills).

How WSS triggers Evictions: Node-pressure Eviction (This page explicitly details how the kubelet uses the memory.available signal, which is derived from node capacity minus the working set size).

Latest changes. Pointer to the code 

Swap Memory Management (Core Concepts & Configuration): https://kubernetes.io/docs/concepts/cluster-administration/swap-memory-management/

The post The Failover Brownout: Rethinking High Availability in MySQL Group Replication appeared first on Percona.

Aug
21
2025
--

MySQL Router 8.4: How to Deal with Metadata Updates Overhead

It may be surprising when a new InnoDB Cluster is set up, and despite not being in production yet and completely idle, it manifests a significant amount of writes visible in growing binary logs. This effect became much more spectacular after MySQL version 8.4. In this write-up, I will explain why it happens and how to address […]

Aug
14
2024
--

Effective Strategies for Recovering MySQL Group Replication From Failures

Group replication is a fault-tolerant/highly available replication topology that ensures if the primary node goes down, one of the other candidates or secondary members takes over so write and read operations can continue without any interruptions. However, there are some scenarios where, due to outages, network partitions, or database crashes, the group membership could be broken, or we end […]

Jun
24
2024
--

Understanding Basic Flow Control Activity in MySQL Group Replication: Part One

Understanding Basic Flow Control Activity in MySQL Group ReplicationFlow control is not a new term, and we have already heard it a lot of times in Percona XtraDB Cluster/Galera-based environments.  In very simple terms, it means the cluster node can’t keep up with the cluster write pace. The write rate is too high, or the nodes are oversaturated. Flow control helps avoid excessive […]

Jan
09
2024
--

How to Use Group Replication with Haproxy

Group Replication with HaproxyWhen working with group replication, MySQL router would be the obvious choice for the connection layer. It is tightly coupled with the rest of the technologies since it is part of the InnoDB cluster stack.The problem is that except for simple workloads, MySQL router’s performance is still not on par with other proxies like Haproxy […]

Jan
11
2022
--

Online DDL With Group Replication in MySQL 8.0.27

Online DDL With Group Replication in MySQL 8.0.27

Online DDL With Group Replication in MySQL 8.0.27In April 2021, I wrote an article about Online DDL and Group Replication. At that time we were dealing with MySQL 8.0.23 and also opened a bug report which did not have the right answer to the case presented. 

Anyhow, in that article I have shown how an online DDL was de facto locking the whole cluster for a very long time even when using the consistency level set to EVENTUAL.

This article is to give justice to the work done by the MySQL/Oracle engineers to correct that annoying inconvenience. 

Before going ahead, let us remember how an Online DDL was propagated in a group replication cluster, and identify the differences with what happens now, all with the consistency level set to EVENTUAL (see).

In MySQL 8.0.23 we were having:

While in MySQL 8.0.27 we have:

As you can see from the images we have three different phases. Phase one is the same between version 8.0.23 and version 8.0.27. 

Phases two and three, instead, are quite different. In MySQL 8.0.23 after the DDL is applied on the Primary, it is propagated to the other nodes, but a metalock was also acquired and the control was NOT returned. The result was that not only the session executing the DDL was kept on hold, but also all the other sessions performing modifications. 

Only when the operation was over on all secondaries, the DDL was pushed to Binlog and disseminated for Asynchronous replication, lock raised and operation can restart.

Instead, in MySQL 8.0.27,  once the operation is over on the primary the DDL is pushed to binlog, disseminated to the secondaries and control returned. The result is that the write operations on primary have no interruption whatsoever and the DDL is distributed to secondary and Asynchronous replication at the same time. 

This is a fantastic improvement, available only with consistency level EVENTUAL, but still, fantastic.

Let’s See Some Numbers

To test the operation, I have used the same approach used in the previous tests in the article mentioned above.

Connection 1:
    ALTER TABLE windmills_test ADD INDEX idx_1 (`uuid`,`active`), ALGORITHM=INPLACE, LOCK=NONE;
    ALTER TABLE windmills_test drop INDEX idx_1, ALGORITHM=INPLACE;
    
Connection 2:
 while [ 1 = 1 ];do da=$(date +'%s.%3N');/opt/mysql_templates/mysql-8P/bin/mysql --defaults-file=./my.cnf -uroot -D windmills_large -e "insert into windmills_test  select null,uuid,millid,kwatts_s,date,location,active,time,strrecordtype from windmill7 limit 1;" -e "select count(*) from windmills_large.windmills_test;" > /dev/null;db=$(date +'%s.%3N'); echo "$(echo "($db - $da)"|bc)";sleep 1;done

Connection 3:
 while [ 1 = 1 ];do da=$(date +'%s.%3N');/opt/mysql_templates/mysql-8P/bin/mysql --defaults-file=./my.cnf -uroot -D windmills_large -e "insert into windmill8  select null,uuid,millid,kwatts_s,date,location,active,time,strrecordtype from windmill7 limit 1;" -e "select count(*) from windmills_large.windmills_test;" > /dev/null;db=$(date +'%s.%3N'); echo "$(echo "($db - $da)"|bc)";sleep 1;done

Connections 4-5:
     while [ 1 = 1 ];do echo "$(date +'%T.%3N')";/opt/mysql_templates/mysql-8P/bin/mysql --defaults-file=./my.cnf -uroot -D windmills_large -e "show full processlist;"|egrep -i -e "(windmills_test|windmills_large)"|grep -i -v localhost;sleep 1;done

Modifying a table with ~5 million rows:

node1-DC1 (root@localhost) [windmills_large]>select count(*) from  windmills_test;
+----------+
| count(*) |
+----------+
|  5002909 |
+----------+

The numbers below represent the time second/milliseconds taken by the operation to complete. While I was also catching the state of the ALTER on the other node I am not reporting it here given it is not relevant. 

EVENTUAL (on the primary only)
-------------------
Node 1 same table:
.184
.186 <--- no locking during alter on the same node
.184
<snip>
.184
.217 <--- moment of commit
.186
.186
.186
.185

Node 1 another table :
.189
.198 <--- no locking during alter on the same node
.188
<snip>
.191
.211  <--- moment of commit
.194

As you can see there is just a very small delay at the moment of commit, but other impacts.

Now if we compare this with the recent tests I have done for Percona XtraDB Cluster (PXC) Non-Blocking operation (see A Look Into Percona XtraDB Cluster Non-Blocking Operation for Online Schema Upgrade) with the same number of rows and same kind of table/data:

Action Group Replication PXC (NBO)
Time on hold for insert for altering table ~ 0.217 sec ~ 120 sec
Time on hold for insert for another table ~ 0.211 sec ~ 25 sec

However, yes there is a however, PXC was maintaining consistency between the different nodes during the DDL execution, while MySQL 8.0.27 with Group Replication was postponing consistency on the secondaries, thus Primary and Secondary were not in sync until full DDL finalization on the secondaries.

Conclusions

MySQL 8.0.27 comes with this nice fix that significantly reduces the impact of an online DDL operation on a busy server. But we can still observe a significant misalignment of the data between the nodes when a DDL is executing. 

On the other hand, PXC with NBO is a bit more “expensive” in time, but nodes remain aligned all the time.

In the end, is what is more important for you to choose one or the other solution, consistency vs. operational impact.

Great MySQL to all.

Apr
19
2021
--

MySQL Group Replication: Conversion of GR Member to Async Replica (and Back) In the Same Cluster

MySQL Group Replication

MySQL Group ReplicationMySQL Group Replication is a plugin that helps to implement highly available fault-tolerant replication topologies. In this blog, I am going to explain the complete steps involved in the below two topics.

  • How to convert the group replication member to an asynchronous replica
  • How to convert the asynchronous replica to a group replication member

Why Am I Converting From GR Back to Old Async?

Recently I had a requirement from one of our customers running 5 node GR clusters. Once a month they are doing the bulk read job for generating the business reports. When they are doing the job, it affects the overall cluster performance because of the flow control issues. The node which is executing the read job is overloaded and delays the certification and writes apply process. The read job queries can’t be split across the cluster.  So, they don’t want that particular node as a part of the cluster during the report generation. So, I recommended this approach. The overall job will take 3-4 hours. During that particular time, the topology will be 4 node clusters and one asynchronous replica. Once the job is completed, the async replica node will be again joined to the GR cluster. 

For testing this, I have installed and configured the group replication cluster with 5 nodes ( gr1,gr2,gr3,gr4,gr5 ). The cluster is operating with a single primary mode.

mysql> select member_host,member_state,member_role,member_version from performance_schema.replication_group_members;
+-------------+--------------+-------------+----------------+
| member_host | member_state | member_role | member_version |
+-------------+--------------+-------------+----------------+
| gr5         | ONLINE       | SECONDARY   | 8.0.22         |
| gr4         | ONLINE       | SECONDARY   | 8.0.22         |
| gr3         | ONLINE       | SECONDARY   | 8.0.22         |
| gr2         | ONLINE       | SECONDARY   | 8.0.22         |
| gr1         | ONLINE       | PRIMARY     | 8.0.22         |
+-------------+--------------+-------------+----------------+
5 rows in set (0.00 sec)

Using Percona Server for MySQL 8.0.22.

mysql> select @@version, @@version_comment\G
*************************** 1. row ***************************
        @@version: 8.0.22-13
@@version_comment: Percona Server (GPL), Release 13, Revision 6f7822f
1 row in set (0.01 sec)


Percona Live ONLINE, the open source database conference, is coming up! Registration is now OPEN… and FREE! 


How to Convert the Group Replication Member to Asynchronous Replica?

To explain this topic, 

  • I am going to convert the group replication member “gr5” to an asynchronous replica.
  • The GR member “gr4” will be the source for “gr5”.

Current status:

+-------------+--------------+-------------+----------------+
| member_host | member_state | member_role | member_version |
+-------------+--------------+-------------+----------------+
| gr5         | ONLINE       | SECONDARY   | 8.0.22         |
| gr4         | ONLINE       | SECONDARY   | 8.0.22         |
| gr3         | ONLINE       | SECONDARY   | 8.0.22         |
| gr2         | ONLINE       | SECONDARY   | 8.0.22         |
| gr1         | ONLINE       | PRIMARY     | 8.0.22         |
+-------------+--------------+-------------+----------------+

Step 1: 

— Take out the node “gr5” from the cluster.

gr5 > stop group_replication;
Query OK, 0 rows affected (4.64 sec)

Current cluster status:

+-------------+--------------+-------------+----------------+
| member_host | member_state | member_role | member_version |
+-------------+--------------+-------------+----------------+
| gr4         | ONLINE       | SECONDARY   | 8.0.22         |
| gr3         | ONLINE       | SECONDARY   | 8.0.22         |
| gr2         | ONLINE       | SECONDARY   | 8.0.22         |
| gr1         | ONLINE       | PRIMARY     | 8.0.22         |
+-------------+--------------+-------------+----------------+

Current “gr5” status:

+-------------+--------------+-------------+----------------+
| member_host | member_state | member_role | member_version |
+-------------+--------------+-------------+----------------+
| gr5         | OFFLINE      |             |                |
+-------------+--------------+-------------+----------------+
1 row in set (0.00 sec)

Step 2:

Update the connection parameters to not allow communication with other Cluster nodes. 

gr5 > select @@group_replication_group_seeds, @@group_replication_ip_whitelist\G
*************************** 1. row ***************************
 @@group_replication_group_seeds: 172.28.128.23:33061,172.28.128.22:33061,172.28.128.21:33061,172.28.128.20:33061,172.28.128.19:33061
@@group_replication_ip_whitelist: 172.28.128.23,172.28.128.22,172.28.128.21,172.28.128.20,172.28.128.19
1 row in set (0.00 sec)

gr5 > set global group_replication_group_seeds='';
Query OK, 0 rows affected (0.00 sec)

gr5 > set global group_replication_ip_whitelist='';
Query OK, 0 rows affected, 1 warning (0.00 sec)

gr5 > select @@group_replication_group_seeds, @@group_replication_ip_whitelist;
+---------------------------------+----------------------------------+
| @@group_replication_group_seeds | @@group_replication_ip_whitelist |
+---------------------------------+----------------------------------+
|                                 |                                  |
+---------------------------------+----------------------------------+
1 row in set (0.00 sec)

Step 3:

Remove the group replication channel configurations and the respective physical files. During the group replication configuration, it will create two channels and the respective files (applier/recovery files). 

gr5 > select Channel_name from mysql.slave_master_info;
+----------------------------+
| Channel_name               |
+----------------------------+
| group_replication_applier  |
| group_replication_recovery |
+----------------------------+
2 rows in set (0.00 sec)

[root@gr5 mysql]# ls -lrth | grep -i replication
-rw-r-----. 1 mysql mysql  225 Apr 12 19:18 gr5-relay-bin-group_replication_applier.000001
-rw-r-----. 1 mysql mysql   98 Apr 12 19:18 gr5-relay-bin-group_replication_applier.index
-rw-r-----. 1 mysql mysql  226 Apr 12 19:18 gr5-relay-bin-group_replication_recovery.000001
-rw-r-----. 1 mysql mysql  273 Apr 12 19:18 gr5-relay-bin-group_replication_recovery.000002
-rw-r-----. 1 mysql mysql  100 Apr 12 19:18 gr5-relay-bin-group_replication_recovery.index
-rw-r-----. 1 mysql mysql  660 Apr 12 19:18 gr5-relay-bin-group_replication_applier.000002

We can remove them by resetting the replica status.

gr5 > reset replica all;
Query OK, 0 rows affected (0.02 sec)

gr5 > select Channel_name from mysql.slave_master_info;
Empty set (0.00 sec)

[root@gr5 mysql]# ls -lrth | grep -i replication
[root@gr5 mysql]#

Step 4:

Configure asynchronous replication. To configure, we don’t need to manually update the binlog/gtid positions. Group replication will run based on the GTID. The node was already configured as a member in the same group so it should already have the GTID entries. 

gr5 > select @@gtid_executed, @@gtid_purged\G
*************************** 1. row ***************************
@@gtid_executed: ae2434f6-2be4-4d15-a5dc-fd54919b79b0:1-8,
b93e0429-989d-11eb-ad7b-5254004d77d3:1
  @@gtid_purged: ae2434f6-2be4-4d15-a5dc-fd54919b79b0:1-2,
b93e0429-989d-11eb-ad7b-5254004d77d3:1
1 row in set (0.00 sec)

Just need to run the CHANGE MASTER command.

gr5 > change master to master_user='gr_repl',master_password='Repl@321',master_host='gr4',master_auto_position=1;
Query OK, 0 rows affected, 2 warnings (0.05 sec)

gr5 > start replica;
Query OK, 0 rows affected (0.02 sec)

gr5 > pager grep -i 'Master_Host\|Slave_IO_Running\|Slave_SQL_Running\|Seconds_Behind_Master'
PAGER set to 'grep -i 'Master_Host\|Slave_IO_Running\|Slave_SQL_Running\|Seconds_Behind_Master''
gr5 > show slave status\G
                  Master_Host: gr4
             Slave_IO_Running: Yes
            Slave_SQL_Running: Yes
        Seconds_Behind_Master: 0
      Slave_SQL_Running_State: Slave has read all relay log; waiting for more updates
1 row in set, 1 warning (0.00 sec)

So, finally, the current topology is:

  • We have 4 node group replication clusters ( gr1, gr2, gr3, gr4 ).
  • The node “gr5” is configured as an async replica under the “gr4”.

How to Convert the Async Replica to Group Replication Member?

To explain this topic: 

  • I am going to break the asynchronous replication on “gr5”.
  • Then, I will join the node “gr5” to the group replication cluster.

Step 1:

Break replication on “gr5” and reset the replica.

gr5 > stop replica;
Query OK, 0 rows affected (0.00 sec)

gr5 > reset replica all;
Query OK, 0 rows affected (0.00 sec)

gr5 > show replica status\G
Empty set (0.00 sec)

Step 2:

Configure the connection parameters to join to the cluster. 

gr5 > select @@group_replication_group_seeds, @@group_replication_ip_whitelist;
+---------------------------------+----------------------------------+
| @@group_replication_group_seeds | @@group_replication_ip_whitelist |
+---------------------------------+----------------------------------+
|                                 |                                  |
+---------------------------------+----------------------------------+
1 row in set (0.00 sec)

gr5 > set global group_replication_group_seeds='172.28.128.23:33061,172.28.128.22:33061,172.28.128.21:33061,172.28.128.20:33061,172.28.128.19:33061';
Query OK, 0 rows affected (0.00 sec)

gr5 > set global group_replication_ip_whitelist='172.28.128.23,172.28.128.22,172.28.128.21,172.28.128.20,172.28.128.19';
Query OK, 0 rows affected, 1 warning (0.00 sec)

gr5 > select @@group_replication_group_seeds, @@group_replication_ip_whitelist\G
*************************** 1. row ***************************
 @@group_replication_group_seeds: 172.28.128.23:33061,172.28.128.22:33061,172.28.128.21:33061,172.28.128.20:33061,172.28.128.19:33061
@@group_replication_ip_whitelist: 172.28.128.23,172.28.128.22,172.28.128.21,172.28.128.20,172.28.128.19
1 row in set (0.00 sec)

Step 3:

Configure the channel for “group_replication_recovery”. 

gr5 > change master to master_user='gr_repl',master_password='Repl@321' for channel 'group_replication_recovery';
Query OK, 0 rows affected, 2 warnings (0.02 sec)

Note: No need to configure the GTID parameters before starting the group replication service, because the node was already configured as an async replica in the same group. So, when starting the group replication service, it will automatically start with the last GTID position executed by async replication and start to sync the rest of the data.

Step 4:

Start the group replication service

gr5 > start group_replication;
Query OK, 0 rows affected, 1 warning (3.02 sec)

Final status:

mysql> select member_host,member_state,member_role,member_version from performance_schema.replication_group_members;
+-------------+--------------+-------------+----------------+
| member_host | member_state | member_role | member_version |
+-------------+--------------+-------------+----------------+
| gr5         | ONLINE       | SECONDARY   | 8.0.22         |
| gr4         | ONLINE       | SECONDARY   | 8.0.22         |
| gr3         | ONLINE       | SECONDARY   | 8.0.22         |
| gr2         | ONLINE       | SECONDARY   | 8.0.22         |
| gr1         | ONLINE       | PRIMARY     | 8.0.22         |
+-------------+--------------+-------------+----------------+
5 rows in set (0.00 sec)

I hope this blog post will be helpful to someone, who is learning or working with MySQL Group replication.

Cheers!

Nov
05
2018
--

How to Quickly Add a Node to an InnoDB Cluster or Group Replication

Quickly Add a Node in InnoDB Cluster or Group Replication

Quickly Add a Node to an InnoDB Cluster or Group Replication

Quickly Add a Node to an InnoDB Cluster or Group Replication (Shutterstock)

In this blog, we’ll look at how to quickly add a node to an InnoDB Cluster or Group Replication using Percona XtraBackup.

Adding nodes to a Group Replication cluster can be easy (documented here), but it only works if the existing nodes have retained all the binary logs since the creation of the cluster. Obviously, this is possible if you create a new cluster from scratch. The nodes rotate old logs after some time, however. Technically, if the

gtid_purged

 set is non-empty, it means you will need another method to add a new node to a cluster. You also need a different method if data becomes inconsistent across cluster nodes for any reason. For example, you might hit something similar to this bug, or fall prey to human error.

Hot Backup to the Rescue

The quick and simple method I’ll present here requires the Percona XtraBackup tool to be installed, as well as some additional small tools for convenience. I tested my example on Centos 7, but it works similarly on other Linux distributions. First of all, you will need the Percona repository installed:

# yum install http://www.percona.com/downloads/percona-release/redhat/0.1-6/percona-release-0.1-6.noarch.rpm -y -q

Then, install Percona XtraBackup and the additional tools. You might need to enable the EPEL repo for the additional tools and the experimental Percona repo for XtraBackup 8.0 that works with MySQL 8.0. (Note: XtraBackup 8.0 is still not GA when writing this article, and we do NOT recommend or advise that you install XtraBackup 8.0 into a production environment until it is GA). For MySQL 5.7, Xtrabackup 2.4 from the regular repo is what you are looking for:

# grep -A3 percona-experimental-\$basearch /etc/yum.repos.d/percona-release.repo
[percona-experimental-$basearch]
name = Percona-Experimental YUM repository - $basearch
baseurl = http://repo.percona.com/experimental/$releasever/RPMS/$basearch
enabled = 1

# yum install pv pigz nmap-ncat percona-xtrabackup-80 -q
==============================================================================================================================================
 Package                             Arch                 Version                             Repository                                 Size
==============================================================================================================================================
Installing:
 nmap-ncat                           x86_64               2:6.40-13.el7                       base                                      205 k
 percona-xtrabackup-80               x86_64               8.0.1-2.alpha2.el7                  percona-experimental-x86_64                13 M
 pigz                                x86_64               2.3.4-1.el7                         epel                                       81 k
 pv                                  x86_64               1.4.6-1.el7                         epel                                       47 k
Installing for dependencies:
 perl-DBD-MySQL                      x86_64               4.023-6.el7                         base                                      140 k
Transaction Summary
==============================================================================================================================================
Install  4 Packages (+1 Dependent package)
Is this ok [y/d/N]: y
#

You need to do it on both the source and destination nodes. Now, my existing cluster node (I will call it a donor) – gr01 looks like this:

gr01 > select * from performance_schema.replication_group_members\G
*************************** 1. row ***************************
  CHANNEL_NAME: group_replication_applier
     MEMBER_ID: 76df8268-c95e-11e8-b55d-525400cae48b
   MEMBER_HOST: gr01
   MEMBER_PORT: 3306
  MEMBER_STATE: ONLINE
   MEMBER_ROLE: PRIMARY
MEMBER_VERSION: 8.0.13
1 row in set (0.00 sec)
gr01 > show global variables like 'gtid%';
+----------------------------------+-----------------------------------------------+
| Variable_name                    | Value                                         |
+----------------------------------+-----------------------------------------------+
| gtid_executed                    | aaaaaaaa-aaaa-aaaa-aaaa-aaaaaaaaaaaa:1-302662 |
| gtid_executed_compression_period | 1000                                          |
| gtid_mode                        | ON                                            |
| gtid_owned                       |                                               |
| gtid_purged                      | aaaaaaaa-aaaa-aaaa-aaaa-aaaaaaaaaaaa:1-295538 |
+----------------------------------+-----------------------------------------------+
5 rows in set (0.01 sec)

The new node candidate (I will call it a joiner) – gr02, has no data but the same MySQL version installed. It also has the required settings in place, like the existing node address in group_replication_group_seeds, etc. The next step is to stop the MySQL service on the joiner (if already running), and wipe out it’s datadir:

[root@gr02 ~]# rm -fr /var/lib/mysql/*

and start the “listener” process, that waits to receive the data snapshot (remember to open the TCP port if you have a firewall):

[root@gr02 ~]# nc -l -p 4444 |pv| unpigz -c | xbstream -x -C /var/lib/mysql

Then, start the backup job on the donor:

[root@gr01 ~]# xtrabackup --user=root --password=*** --backup --parallel=4 --stream=xbstream --target-dir=./ 2> backup.log |pv|pigz -c --fast| nc -w 2 192.168.56.98 4444
240MiB 0:00:02 [81.4MiB/s] [ <=>

On the joiner side, we will see:

[root@gr02 ~]# nc -l -p 4444 |pv| unpigz -c | xbstream -x -C /var/lib/mysql
21.2MiB 0:03:30 [ 103kiB/s] [ <=> ]
[root@gr02 ~]# du -hs /var/lib/mysql
241M /var/lib/mysql

BTW, if you noticed the difference in transfer rate between the two, please note that on the donor side I put

|pv|

 before the compressor while in the joiner before decompressor. This way, I can monitor the compression ratio at the same time!

The next step will be to prepare the backup on joiner:

[root@gr02 ~]# xtrabackup --use-memory=1G --prepare --target-dir=/var/lib/mysql 2>prepare.log
[root@gr02 ~]# tail -1 prepare.log
181019 19:18:56 completed OK!

and fix the files ownership:

[root@gr02 ~]# chown -R mysql:mysql /var/lib/mysql

Now we should verify the GTID position information and restart the joiner (I have the

group_replication_start_on_boot=off

 in my.cnf):

[root@gr02 ~]# cat /var/lib/mysql/xtrabackup_binlog_info
binlog.000023 893 aaaaaaaa-aaaa-aaaa-aaaa-aaaaaaaaaaaa:1-302662
[root@gr02 ~]# systemctl restart mysqld

Now, let’s check if the position reported by the node is consistent with the above:

gr02 > select @@GLOBAL.gtid_executed;
+-----------------------------------------------+
| @@GLOBAL.gtid_executed                        |
+-----------------------------------------------+
| aaaaaaaa-aaaa-aaaa-aaaa-aaaaaaaaaaaa:1-302660 |
+-----------------------------------------------+
1 row in set (0.00 sec)

No, it is not. We have to correct it:

gr02 > reset master; set global gtid_purged="aaaaaaaa-aaaa-aaaa-aaaa-aaaaaaaaaaaa:1-302662";
Query OK, 0 rows affected (0.05 sec)
Query OK, 0 rows affected (0.00 sec)

Finally, start the replication:

gr02 > START GROUP_REPLICATION;
Query OK, 0 rows affected (3.91 sec)

Let’s check the cluster status again:

gr01 > select * from performance_schema.replication_group_members\G
*************************** 1. row ***************************
CHANNEL_NAME: group_replication_applier
MEMBER_ID: 76df8268-c95e-11e8-b55d-525400cae48b
MEMBER_HOST: gr01
MEMBER_PORT: 3306
MEMBER_STATE: ONLINE
MEMBER_ROLE: PRIMARY
MEMBER_VERSION: 8.0.13
*************************** 2. row ***************************
CHANNEL_NAME: group_replication_applier
MEMBER_ID: a60a4124-d3d4-11e8-8ef2-525400cae48b
MEMBER_HOST: gr02
MEMBER_PORT: 3306
MEMBER_STATE: ONLINE
MEMBER_ROLE: SECONDARY
MEMBER_VERSION: 8.0.13
2 rows in set (0.00 sec)
gr01 > select * from performance_schema.replication_group_member_stats\G
*************************** 1. row ***************************
                              CHANNEL_NAME: group_replication_applier
                                   VIEW_ID: 15399708149765074:4
                                 MEMBER_ID: 76df8268-c95e-11e8-b55d-525400cae48b
               COUNT_TRANSACTIONS_IN_QUEUE: 0
                COUNT_TRANSACTIONS_CHECKED: 3
                  COUNT_CONFLICTS_DETECTED: 0
        COUNT_TRANSACTIONS_ROWS_VALIDATING: 0
        TRANSACTIONS_COMMITTED_ALL_MEMBERS: aaaaaaaa-aaaa-aaaa-aaaa-aaaaaaaaaaaa:1-302666
            LAST_CONFLICT_FREE_TRANSACTION: aaaaaaaa-aaaa-aaaa-aaaa-aaaaaaaaaaaa:302665
COUNT_TRANSACTIONS_REMOTE_IN_APPLIER_QUEUE: 0
         COUNT_TRANSACTIONS_REMOTE_APPLIED: 2
         COUNT_TRANSACTIONS_LOCAL_PROPOSED: 3
         COUNT_TRANSACTIONS_LOCAL_ROLLBACK: 0
*************************** 2. row ***************************
                              CHANNEL_NAME: group_replication_applier
                                   VIEW_ID: 15399708149765074:4
                                 MEMBER_ID: a60a4124-d3d4-11e8-8ef2-525400cae48b
               COUNT_TRANSACTIONS_IN_QUEUE: 0
                COUNT_TRANSACTIONS_CHECKED: 0
                  COUNT_CONFLICTS_DETECTED: 0
        COUNT_TRANSACTIONS_ROWS_VALIDATING: 0
        TRANSACTIONS_COMMITTED_ALL_MEMBERS: aaaaaaaa-aaaa-aaaa-aaaa-aaaaaaaaaaaa:1-302666
            LAST_CONFLICT_FREE_TRANSACTION:
COUNT_TRANSACTIONS_REMOTE_IN_APPLIER_QUEUE: 0
         COUNT_TRANSACTIONS_REMOTE_APPLIED: 0
         COUNT_TRANSACTIONS_LOCAL_PROPOSED: 0
         COUNT_TRANSACTIONS_LOCAL_ROLLBACK: 0
2 rows in set (0.00 sec)

OK, our cluster is consistent! The new node joined successfully as secondary. We can proceed to add more nodes!

Jul
09
2018
--

InnoDB Cluster in a nutshell – Part 1

innodb cluster in a nutshell part 1

Since MySQL 5.7 we have a new player in the field, MySQL InnoDB Cluster. This is an Oracle High Availability solution that can be easily installed over MySQL to get High Availability with multi-master capabilities and automatic failover.

This solution consists in 3 components: InnoDB Group Replication, MySQL Router and MySQL Shell, you can see how these components interact in this graphic:

Graphic describing InnoDB Group Replication, MySQL Router and MySQL Shell

In this three blog post series, we will cover each of this components to get a sense of what this tool provides and how it can help with architecture decisions.

Group Replication

This is the actual High Availability solution, and a while ago I wrote a short review of it when it still was in its labs stage. It has improved a lot since then.

This solution is based on a plugin that has to be installed (not installed by default) and works on the top of built-in replication. So it relies on binary logs and relay logs to apply writes to members of the cluster.

The main concept about this new type of replication is that all members of a cluster (i.e. each node) are considered equals. This means there is no master-slave (where slaves follow master) but members that apply transactions based on a consensus algorithm. This algorithm forces all members of a cluster to commit or reject a given transaction following decisions made by each individual member.

In practical terms, this means each member of the cluster has to decide if a transaction can be committed (i.e. no conflicts) or should be rolled back but all other members follow this decision. In other words, the transaction is either committed or rolled back according to the majority of members in a consistent state.

To achieve this, there is a service that exposes a view of cluster status indicating what members form the cluster and the current status of each of them. Additionally Group Replication requires GTID and Row Based Replication (or

binlog_format=ROW

 ) to distribute each writeset with row changes between members. This is done via binary logs and relay logs but before each transaction is pushed to binary/relay logs it has to be acknowledged by a majority of members of the clusters, in other words through consensus. This process is synchronous, unlike legacy replication. After a transaction is replicated we have a certification process to commit the transaction, and thus making it durable.

Here appears a new concept, the certification process, which is the process that confirms if a writeset can be applied/committed (i.e. a row change can be done without conflicts) after replication of the transaction is complete.

Basically this process consists of inspecting writesets to check if there are conflicts (i.e. same row updated by concurrent transactions). Based on an order set in the writeset, the conflict is resolved by ‘first-commiter wins’ while the second is rolled back in the originator. Finally, the transaction is pushed to binary/relay logs and committed.

Solution features

Some other features provided by this solution are:

  • Single-primary or multi-primary modes meaning that the cluster can operate with a single writer and multiple readers (recommended and default setup); or with multiple writers where all nodes are capable to accept write transactions. The latter is at the cost of a performance penalty due to conflict resolution.
  • Automatic failure detection, where an internal mechanism is able to detect a failed node (i.e. a crash, network problems, etc) and decide to exclude it from the cluster automatically. Also if a member can’t communicate with the cluster and gets isolated, it can’t accept transactions. This ensures that cluster data is not impacted by this situation.
  • Fault tolerance. This is the strategy that the cluster uses to support failing members. As described above, this is based on a majority. A cluster needs at least three members to support one node failure because the other two members will keep the majority. The bigger the number of nodes, the bigger the number of failing nodes the cluster supports. The maximum number of members (nodes) in a cluster is currently limited to 7. If it has seven members, then the majority is kept by four or more active members. In other words, a cluster of seven would support up to three failing nodes.

We will not cover installation and configuration aspects now. This will probably come with a new series of blogs where we can cover not only deployment but also use cases and so on.

In the next post we will talk about the next cluster component: MySQL Router, so stay tuned.

The post InnoDB Cluster in a nutshell – Part 1 appeared first on Percona Database Performance Blog.

Sep
25
2017
--

Percona Live Europe: Tutorials Day

Percona Live Tutorials

Percona Live Europe TutorialsWelcome to the first day of the Percona Live Open Source Database Conference Europe 2017: Tutorials day! Technically the first day of the conference, this day focused on provided hands-on tutorials for people interested in learning directly how to use open source tools and technologies.

Today attendees went to training sessions taught by open source database experts and got first-hand experience configuring, working with, and experimenting with various open source technologies and software.

The first full day (which includes opening keynote speakers and breakout sessions) starts Tuesday 9/26 at 9:15 am.

Some of the tutorial topics covered today were:

Percona Live Europe TutorialsMonitoring MySQL Performance with Percona Monitoring and Management (PMM)

Michael Coburn, Percona

This was a hands-on tutorial covering how to set up monitoring for MySQL database servers using the Percona Monitoring and Management (PMM) platform. PMM is an open-source collection of tools for managing and monitoring MySQL and MongoDB performance. It provides thorough time-based analysis for database servers to ensure that they work as efficiently as possible.

We learned about:

  • The best practices on MySQL monitoring
  • Metrics and time series
  • Data collection, management and visualization tools
  • Monitoring deployment
  • How to use graphs to spot performance issues
  • Query analytics
  • Alerts
  • Trending and capacity planning
  • How to monitor HA

Percona Live Europe TutorialsHands-on ProxySQL

Rene Cannao, ProxySQL

ProxySQL is an open source proxy for MySQL that can provide HA and high performance with no changes in the application, using several built-in features and integration with clustering software. Those were only a few of the features we learned about in this hands-on tutorial.

Percona Live Europe TutorialsMongoDB: Sharded Cluster Tutorial

Jason Terpko, ObjectRocket
Antonios Giannopoulos, ObjectRocket

This tutorial guided us through the many considerations when deploying a sharded cluster. It covered the services that make up a sharded cluster, configuration recommendations for these services, shard key selection, use cases, and how data is managed within a sharded cluster. Maintaining a sharded cluster also has its challenges. We reviewed these challenges and how you can prevent them with proper design or ways to resolve them if they exist today.

Percona Live Europe TutorialsInnoDB Architecture and Performance Optimization

Peter Zaitsev, Percona

InnoDB is the most commonly used storage engine for MySQL and Percona Server for MySQL. It is the focus of most of the storage engine development by the MySQL and Percona Server for MySQL development teams.

In this tutorial, we looked at the InnoDB architecture, including new feature developments for InnoDB in MySQL 5.7 and Percona Server for MySQL 5.7. Peter explained how to use InnoDB in a database environment to get the best application performance and provide specific advice on server configuration, schema design, application architecture and hardware choices.

Peter updated this tutorial from previous versions to cover new MySQL 5.7 and Percona Server for MySQL 5.7 InnoDB features.

Join us tomorrow for the first full day of the Percona Live Open Source Database Conference Europe 2017!

Powered by WordPress | Theme: Aeros 2.0 by TheBuckmaker.com