Nov
03
2022
--

Raspberry on the Rocks: Build Percona Server for MySQL With MyRocks on Your Raspberry Pi

Percona Server for MySQL With MyRocks on Your Raspberry Pi

Percona Server for MySQL With MyRocks on Your Raspberry Pi
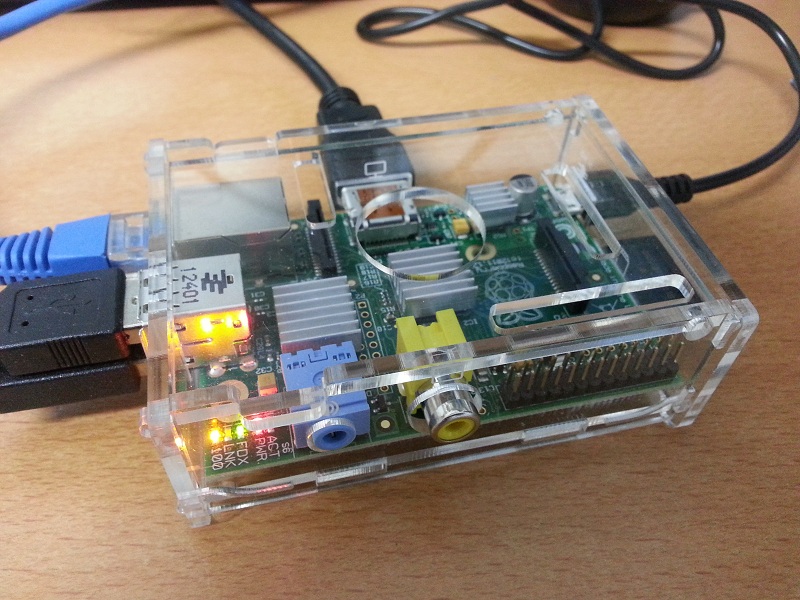
Raspberry PI is a small single-board computer (SBCs) developed by the Raspberry Pi Foundation in association with Broadcom. This tiny computer is extremely popular and widely used in many areas. Thanks to its size, low cost, and low energy requirements, it can be used to collect data in remote locations or from sensor devices. We often need to be able to store large amounts of data efficiently on these devices.

MyRocks is a MySQL engine that uses RocksDB to store data. It is space efficient and able to handle writes quite efficiently.

First things first

Building and installing Percona Server for MySQL with MyRocks engine enabled is easy but requires some time. It is essential to make sure that you have all the ingredients and meet all the requirements:

  • Raspberry PI 3, 4, 400, or superior.
  • SD Card with Raspberry Pi OS 11 Bullseye 64 bits
  • Internet connectivity
  • 2 ounces gin
  • 1/2 ounce lemon juice, freshly squeezed
  • 1/2 ounce raspberry syrup
  • One egg white
  • Three raspberries

Preparation tasks

You need a Raspberry PI with a 64bits processor. We assume you already have installed the most recent version of Raspios. As of this writing, the version is 11 Bullseye.

Install screen package

Screen will allow you to reconnect if the connection is lost during the installation procedure. We install it, and we open a new session.

sudo -i
apt-get install screen
screen -LS install_mysql

Increase available memory

To build and install MySQL, you need a significant amount of memory. We recommend adding at least 4Gb of swap.

dd if=/dev/zero of=/swapfile4GB bs=1M count=4096
mkswap /swapfile4GB
chmod 0600 /swapfile4GB
swapon /swapfile4GB

Install additional packages

We need git to clone the Percona repository that contains MySQL.

apt-get install git

And some packages and libraries are needed to build and run MySQL.

apt-get install libjemalloc-dev libjemalloc2
apt-get install libzstd-dev zstd libevent-dev libicu-dev lz4 \
liblz4-dev cmake libprotobuf-dev protobuf-compiler \
libfido2-dev libssl-dev libldap-dev libsasl2-dev \
libsasl2-modules-gssapi-mit libkrb5-dev \
libncurses-dev libaio-dev libreadline-dev \
libprotoc-dev bison libcurl4-openssl-dev

Once we have all those packages installed, we can download the MySQL code.

Build Percona Server for MySQL

Configure the environment and download the source code

First, we create a working directory and move the working directory there.

mkdir ws
cd ws

Then we clone the source code. This process will take some time.

git clone https://github.com/percona/percona-server.git

The Clover Club Cocktail

The Clover Club was a men’s club established in 1882 in Philadelphia. The club met in the Bellevue-Stratford Hotel. It was pretty popular, having writers, lawyers, and businessmen among its members. The club gatherings were not used only to discuss issues of the day, but also included drinks. One of the most liked ones was a cocktail made of gin, lemon juice, raspberry syrup, and egg white.

The Clover Club Cocktail enjoyed some popularity for some time but almost disappeared for most of the 20th century. The cocktail recovered some of its popularity during the first decade of the 21st century thanks to modern cocktail books. More on this later…

Configure the code

The first step is changing to the branch you want to build. In our example, we are using the most recently released branch. But you could use a development branch if you want; just make sure that you understand the implications of using a version that hasn’t been released yet.

cd percona-server
git checkout -b current Percona-Server-8.0.29-21
git submodule init
git submodule update

This will download some additional code.

Fix configuration

If you are building a version previous to 8.0.30, then you need to edit the MyRocks cmake file to allow MyRocks to be built on a different architecture than i86_64. The file is located in percona-server/storage/rocksdb and the name is CMakeLists.txt

What needs to be done is adding arm64 to the supported CPU architectures and checking that specific intel i86_64-specific extensions are not used. If you prefer, you can just replace the file with the version from my GitHub repository.

https://raw.githubusercontent.com/peppla/blog_posts/main/RaspberryOnTheRocks/storage/rocksdb/CMakeLists.txt

Configure

We create a directory only for the build process:

cd ..
mkdir percona-build
cd percona-build

And we launch the configuration process. This process takes some minutes to complete.

cmake ../percona-server \
-DCMAKE_BUILD_TYPE=RelWithDebInfo \
-DBUILD_CONFIG=mysql_release \
-DMYSQL_MAINTAINER_MODE=OFF \
-DDOWNLOAD_BOOST=ON \
-DWITH_BOOST=../deps \
-DWITH_SYSTEM_LIBS=ON \
-DWITHOUT_TOKUDB=ON \
-DWITH_ROCKSDB=ON

The configuration should finish without errors. If you get any error regarding the version of zlib, you can add a flag to the configuration to use the bundled version:

cmake ../percona-server \
-DCMAKE_BUILD_TYPE=RelWithDebInfo \
-DBUILD_CONFIG=mysql_release \
-DMYSQL_MAINTAINER_MODE=OFF \
-DDOWNLOAD_BOOST=ON \
-DWITH_BOOST=../deps \
-DWITH_SYSTEM_LIBS=ON \
-DWITHOUT_TOKUDB=ON \
-DWITH_ROCKSDB=ON \
-DWITH_ZLIB=bundled

Build

Once we complete the configuration, the build process is quite straightforward. Just run the following command:

cmake --build . -- -j 4

The building process will take some time, depending on the speed of your processor and how fast your storage is. In any case, if executed successfully, it should take a few hours.

In the meantime…

To prepare the raspberry syrup:

  • Add one cup of sugar and 1/2 cup of water to a pot.
  • Stir over medium heat until the sugar has dissolved.
  • Reduce heat to low, add 1/2 cup fresh raspberries, and macerate into a pulp.
  • Fine-strain to remove the berry’s tiny seeds.
  • Optionally, add 1/2 oz vodka as a preservative.
  • Refrigerate in a jar until ready for use.

Once the raspberry syrup is ready, we can proceed with the Clover Club Cocktail: Add the gin, lemon juice, raspberry syrup, and egg white into a shaker with ice and shake vigorously until well-chilled. Strain into a chilled cocktail glass. Garnish with three speared raspberries.

Testing

Once the build process has finished, you can test the results using the MySQL test suite:

./mysql-test/mtr rocksdb.1st

You should get results similar to these:

==============================================================================
TEST NAME RESULT TIME (ms) COMMENT
------------------------------------------------------------------------------
worker[1] mysql-test-run: WARNING: running this script as _root_ will cause some tests to be skipped
[ 25%] rocksdb.1st 'write_prepared' [ pass ] 138
[ 50%] rocksdb.1st 'write_unprepared' [ pass ] 519
[ 75%] rocksdb.1st 'write_committed' [ pass ] 132
[100%] shutdown_report [ pass ]
------------------------------------------------------------------------------
The servers were restarted 2 times
The servers were reinitialized 0 times
Spent 0.789 of 116 seconds executing testcases

Completed: All 4 tests were successful.

Install and distribute

You can install the binaries you recently built by executing the following command:

make install

Or create a compressed tar file that you can use to install the server manually:

make package

Once the binaries are installed, follow the standard procedure to initialize and configure the server.

Warning

According to the Surgeon General, women should not drink alcoholic beverages during pregnancy because of the risk of birth defects. Consumption of alcoholic beverages impairs your ability to drive a car or operate machinery, including databases, and may cause health problems. Consuming raw and lightly cooked eggs poses a risk of foodborne illness.

May
26
2021
--

Compiling a Percona Monitoring and Management v2 Client in ARM: Raspberry Pi 3 Reprise

Percona Monitoring and Management Client Raspberry Pi 3

Percona Monitoring and Management Client Raspberry Pi 3In this follow-up blog to Compiling a Percona Monitoring and Management v2 Client in ARM Architecture, we will show what changes are needed to get the latest versions of PMM working on ARM architecture. In this case, we will do it using a Raspberry Pi 3, instead of the AWS EC2 ARM node. With these two blogs, we are covering a good deal of ground in respect to ways of deploying PMM in ARM. Let us know if you use any other device, though, and we’ll be happy to try if we can get ahold of one!

The latest versions will need the vmagent for supporting the newly added VictoriaMetrics functionality. In this case, the binaries are precompiled by the VM team, so we just need to download them and copy them to the appropriate directories. These steps are exactly the same for AWS, but you should use the ARM64 packages instead.

For ease of use, we have again included binaries in the following project (note that versions kept there may not be current latest at any point): https://github.com/guriandoro/pmm_arm, and a gist with the commands used.

Installing Dependencies

As always, let’s get some basic packages needed out of the way:

sudo apt-get install git
curl -LO https://golang.org/dl/go1.15.2.linux-armv6l.tar.gz
tar xzf go1.15.2.linux-armv6l.tar.gz
sudo mv go /usr/local/go
echo "export PATH=\$PATH:/usr/local/go/bin" >> .bashrc
source .bashrc

shell> go version
go version go1.15.2 linux/arm

After we install these tools, we will clone all needed projects to our Go source directory:

mkdir -p ~/go/src/github.com/percona/
cd ~/go/src/github.com/percona/
git clone https://github.com/percona/pmm-admin.git
git clone https://github.com/percona/pmm-agent.git
git clone https://github.com/percona/node_exporter.git

mkdir -p ~/go/src/github.com/percona/
cd ~/go/src/github.com/percona/
git clone https://github.com/percona/pmm-admin.git
git clone https://github.com/percona/pmm-agent.git
git clone https://github.com/percona/node_exporter.git

And get the VictioraMetrics vmagent binary ready, too:

cd /tmp/
curl -LO https://github.com/VictoriaMetrics/VictoriaMetrics/releases/download/v1.59.0/vmutils-arm-v1.59.0.tar.gz
tar xzf vmutils-arm-v1.59.0.tar.gz

Compiling

As with the previous blog, pmm-admin compilation is straightforward:

cd ~/go/src/github.com/percona/pmm-admin
make release

For node_exporter, we will need the changes for PR 1196:

cd ~/go/src/github.com/percona/node_exporter/
curl -LO https://raw.githubusercontent.com/pgier/node_exporter/1fc4d14c6613766483a8b9117ffa9cc50c1a976d/Makefile.common
make build

Lastly, for pmm-agent, we will also need an additional step. However, before we can introduce the changes, we need to compile and let it fail once:

cd ~/go/src/github.com/percona/pmm-agent
make release
...
/home/pi/go/pkg/mod/github.com/!percona-!lab/pg_query_go@v1.0.1-0.20190723081422-3fc3af54a6f7/parser/include/port/atomics.h:68:10: fatal error: port/atomics/arch-arm.h: No such file or directory
 #include "port/atomics/arch-arm.h"
          ^~~~~~~~~~~~~~~~~~~~~~~~~
compilation terminated.
make: *** [Makefile:27: release] Error 2

We will then need to download the arch-arm.h file to that directory:

cd ~/go/pkg/mod/github.com/\!percona-\!lab/pg_query_go@v1.0.1-0.20190723081422-3fc3af54a6f7/parser/include/port/atomics/
sudo curl -LO https://raw.githubusercontent.com/postgres/postgres/master/src/include/port/atomics/arch-arm.h
sudo chown pi:pi arch-arm.h

And then we are ready to compile pmm-agent successfully:

cd ~/go/src/github.com/percona/pmm-agent
make release

Moving the Files to Their Final Destination

As the last step, let’s create the needed directories and move the files where they belong.

sudo mkdir -p /usr/local/percona/pmm2/
cd /usr/local/percona/pmm2/
sudo mkdir exporters/
sudo mkdir config/
sudo mkdir -p collectors/textfile-collector/high-resolution
sudo mkdir -p collectors/textfile-collector/medium-resolution
sudo mkdir -p collectors/textfile-collector/low-resolution

cd ~/go/src/github.com/percona/
sudo cp pmm-admin/bin/pmm-admin /usr/local/bin/
sudo cp pmm-agent/bin/pmm-agent /usr/local/bin/

sudo cp node_exporter/node_exporter /usr/local/percona/pmm2/exporters/
sudo cp /tmp/vmagent-prod /usr/local/percona/pmm2/exporters/vmagent

Starting the PMM Client

At last, we can configure and start the client!

sudo pmm-agent setup \
 --config-file=/usr/local/percona/pmm2/config/pmm-agent.yaml \
 --server-address=192.168.1.121:443 --server-insecure-tls \
 --server-username=admin --server-password=admin \
 192.168.1.247 generic raspberrypi

sudo pmm-agent --config-file=/usr/local/percona/pmm2/config/pmm-agent.yaml

Check if things are working:

shell> pmm-admin list
Service type        Service name        Address and port        Service ID

Agent type           Status           Metrics Mode        Agent ID                                              Service ID
pmm_agent            Connected                            /agent_id/2e2ed51d-f573-4510-8f4f-8b7899ef4f67
node_exporter        Running          push                /agent_id/6f34eb76-429f-47fb-a178-a1bbf4ddadcb
vmagent              Running          push                /agent_id/80a9e104-aab6-48ef-a709-475330385e32

OS and Disk Usage

Some information about the OS and kernel used:

shell> uname -a
Linux raspberrypi 5.4.83-v7+ #1379 SMP Mon Dec 14 13:08:57 GMT 2020 armv7l GNU/Linux

shell> lsb_release -a
No LSB modules are available.
Distributor ID: Raspbian
Description: Raspbian GNU/Linux 10 (buster)
Release: 10
Codename: buster

As for disk usage, the four compiled binaries will take up 72Mb of space.

Extra Tools

We can also download pt-summary, to get the reports in the Node Summary dashboards:

cd /usr/local/percona/pmm2/tools/
curl -LO percona.com/get/pt-summary
chmod +x pt-summary

We Come in Peace… We Mean you no Harm

Resource usage is in the expected (very low) overhead ranges, as we can see in the following before (completely idle) and after (only PMM client binaries running) top samples.

Before:

top - 05:27:42 up 28 min,  4 users,  load average: 0.00, 0.00, 0.00
Tasks: 135 total,   1 running, 134 sleeping,   0 stopped,   0 zombie
%Cpu(s):  4.9 us,  1.2 sy,  0.0 ni, 93.8 id,  0.0 wa,  0.0 hi,  0.0 si,  0.0 st
MiB Mem :    924.8 total,    543.4 free,    104.3 used,    277.1 buff/cache
MiB Swap:    100.0 total,    100.0 free,      0.0 used.    753.9 avail Mem

  PID USER      PR  NI    VIRT    RES    SHR S  %CPU  %MEM     TIME+ COMMAND
 1082 root      20   0   10432   2864   2480 R  11.1   0.3   0:00.05 top
    1 root      20   0   33784   8072   6392 S   0.0   0.9   0:05.36 systemd
...

After:

top - 05:46:09 up 47 min,  5 users,  load average: 0.08, 0.10, 0.09
Tasks: 144 total,   1 running, 143 sleeping,   0 stopped,   0 zombie
%Cpu(s):  2.0 us,  0.7 sy,  0.0 ni, 97.4 id,  0.0 wa,  0.0 hi,  0.0 si,  0.0 s
MiB Mem :    924.8 total,    495.2 free,    151.9 used,    277.8 buff/cache
MiB Swap:    100.0 total,    100.0 free,      0.0 used.    713.5 avail Mem

  PID USER      PR  NI    VIRT    RES    SHR S  %CPU  %MEM     TIME+ COMMAND
 1136 root      20   0  805056  18368   8136 S   7.9   1.9   0:44.10 node_exporter
 1141 root      20   0  804132  33396   7244 S   1.3   3.5   0:20.27 vmagent
 1214 pi        20   0   10404   3084   2564 R   0.7   0.3   0:00.13 top
...

Conclusion

With this and the blog post linked at the beginning, you should have all the data you need to compile and run Percona Monitoring and Management (PMM) client in either a Raspberry Pi 3 or an AWS EC2 ARM node.

Feb
25
2013
--

Percona Server on the Raspberry Pi: Your own MySQL Database Server for Under $80

There are many reasons for wanting a small MySQL database server:

  • You’re a uni student who wants to learn the SQL language better and needs a mini-testbox
  • You’re a Windows user who wants to play around with Percona Server on Linux
  • You’re a corporate application developer who wants a small SQL development & test box
  • You’re a Internet startup that just needs a tiny startup database server without all the added costs

So, how about if you could setup a small Arch Linux ARMv6-based hardware device which runs Percona Server for MySQL, in a space not much bigger than your mouse, with the power consumption of only a smartphone charger, fully networked, all for under $80?

Introducing the Raspberry Pi with Percona Server:

Raspberry Pi

Raspberry Pi Fully Connected (Only the power + network connections are needed in this tutorial)

A small disclaimer first: Arch Linux is not currently on our list of supported OS’es (i.e. we do not promise to provide binaries, even though they are available from the Arch Linux AUR repository), however if you do happen to run into issues, our support service engineers are happy to provide help.

To get started, here is what you need (prices in AU$):

  • The Raspberry Pi itself (about $36)
    • Make sure to get the v2 (512MiB SDRAM) version
  • A plastic case (~$12 on eBay which includes 3 heatsinks)
  • A SD Card reader (likely build into your laptop or PC already)
  • Network setup
    • A network lead and spare network port on your router
    • A DHCP server (your router likely has this enabled already)
  • A quality 2GB (or more) SDHC Card
    • I use a SanDisk 8GB Class10 30MB/s card (~$8.50 on eBay)
  • A 1Amp+ micro USB power supply + cable
    • I use a 2Amp dual portapow supply (~$20 on eBay)

Total cost: ~76.5 AU$ (= ~79 US$).

Optionally, if your screen has a DVI port, you can get a HDMI Cable + DVI (male)-to-HDMI (female) connector (~$12). This enables you to connect the Raspberry Pi to your screen, and so follow what is happening on the console of the Raspberry Pi. Make sure to get the proper DVI connector for your screen as many connectors that are sold have a wrong pin layout (most standard computer screens use a DVI-D connector, not a DVI-I one).

Alternatively, if you really do end up needing to view the console of your Raspberry Pi (for example to configure an IP address in Arch Linux if you do not have a DHCP server), you can simply hook the Raspberry Pi to your TV set using the Composite RCA (PAL & NTSC) connector.

Once you have your hardware, here is how to get Percona Server for MySQL up and running:

  1. Insert the SD card into a slot on your laptop or desktop PC.
  2. Download Fedora ARM Installer (available for Linux and Windows).
  3. Download the Arch Linux ARM image from the Raspberry Pi website and unzip.
  4. Start Fedora ARM Installer (in Windows make sure to right-click the exe and “Run as administrator”).
    • Select the image file (about 1.8GB .img file) and select the destination drive to write the image to. Make sure you selected the right drive and click “Install”.
    • The image gets written to a 2Gb partition on the card. If you have a larger card, you can add another partition later.
  5. Software eject the SD card using your OS’es software eject system (to prevent partial writes), take out the card and insert into your Pi. Carefull, the card goes upside down :)
  6. Plug in the network lead to the Raspberry Pi, and connect the other end of the lead to your router.
  7. Plug in the Micro USB power lead to the Raspberry Pi, the other side to the power supply. Plug in the power supply.
  8. The Raspberry Pi will automatically get an IP address from the DHCP server (Arch Linux has this preset)
    • Also, Arch Linux has sshd already active (sshd=ssh daemon, a software package allowing you to connect to a [Linux] server console/command prompt).
  9. Connect via ssh to the Raspberry Pi. For windows, I use the Tunnelier SSH Client from Bitvise
    • If you do not know what IP address the Raspberry Pi got (likely the first available address in your DHCP range), you can always check your router’s DHCP table which should list all IP addresses it assigned, usually together with a host name.
    • While there, you could also assign a permanent IP address (still assigned via DHCP) by binding a MAC address to a reserved IP in your router’s DHCP server setup. This makes it easier later on.
    • You could also assign a permanent DNS name (like pi.yourdomain.com) by binding the reserved IP to a DNS name in your router’s DNS server setup.
    • The password for user ‘root’ is ‘root’, and the OS boots in about 10 seconds.
    • Connecting to the Raspberry Pi using Linux (ssh) and Windows (Tunnelier):
      $ ssh root@192.168.0.180
      root@192.168.0.180's password:
      Last login: Fri Feb 22 23:27:49 2013 from percona.<...>
      [root@alarmpi ~]#

      Tunnelier connecting with the Raspberry Pi

  10. Once connected to the Raspberry Pi, either via ssh on Linux or Tunnelier on Windows, update the root password first:
    [root@alarmpi ~]# passwd
    Enter new UNIX password:
    Retype new UNIX password:
    passwd: password updated successfully

    (If you use Windows+Tunnelier and have saved your password in the configuration file, update it in Tunnelier now also)

  11. Re-connect to see if your password change worked as expected, and install Percona Server from the Arch Linux AUR Repo at the same time:
    (pacman is the ‘Package Manager’ for Arch Linux) 

    [root@alarmpi ~]# pacman -S percona-server
    resolving dependencies...
    looking for inter-conflicts...
    
    Targets (4): libaio-0.3.109-6  libmysqlclient-5.5.30-1  mysql-clients-5.5.30-1  percona-server-5.5.29_rel29.4-1
    
    Total Download Size:    8.07 MiB
    Total Installed Size:   96.00 MiB
    
    Proceed with installation? [Y/n] y
    :: Retrieving packages from extra...
    libmysqlclient-5.5.30-1-armv6h                                           3.2 MiB   435K/s 00:08 [########################################################] 100%
    mysql-clients-5.5.30-1-armv6h                                          736.6 KiB   395K/s 00:02 [########################################################] 100%
    :: Retrieving packages from community...
    libaio-0.3.109-6-armv6h                                                  4.6 KiB  1089K/s 00:00 [########################################################] 100%
    percona-server-5.5.29_rel29.4-1-armv6h                                   4.1 MiB   323K/s 00:13 [########################################################] 100%
    (4/4) checking package integrity                                                                 [########################################################] 100%
    (4/4) loading package files                                                                      [########################################################] 100%
    (4/4) checking for file conflicts                                                                [########################################################] 100%
    (4/4) checking available disk space                                                              [########################################################] 100%
    (1/4) installing libmysqlclient                                                                  [########################################################] 100%
    (2/4) installing mysql-clients                                                                   [########################################################] 100%
    (3/4) installing libaio                                                                          [########################################################] 100%
    (4/4) installing percona-server                                                                  [########################################################] 100%
    Installing MySQL system tables...
    OK
    Filling help tables...
    OK
    [...more setup information, please read...]
  12. [Optional] Set Percona server to startup at boot time
    [root@alarmpi ~]# systemctl enable mysqld
    ln -s '/usr/lib/systemd/system/mysqld.service' '/etc/systemd/system/multi-user.target.wants/mysqld.service'
  13. Start Percona Server
    [root@alarmpi ~]# systemctl start mysqld
  14. Connect using the mysql client:
    [root@alarmpi ~]# /usr/bin/mysql
    Welcome to the MySQL monitor.  Commands end with ; or \g.
    [...]
    mysql> SHOW ENGINES;
    +--------------------+---------+----------------------------------------------------------------------------+--------------+------+------------+
    | Engine             | Support | Comment                                                                    | Transactions | XA   | Savepoints |
    +--------------------+---------+----------------------------------------------------------------------------+--------------+------+------------+
    | InnoDB             | DEFAULT | Percona-XtraDB, Supports transactions, row-level locking, and foreign keys | YES          | YES  | YES        |
    [...]
    mysql> SELECT "Hello World!" AS "Success!" \G
    *************************** 1. row ***************************
    Success!: Hello World!
    1 row in set (0.00 sec)

Now that was easy wasn’t it?

A few other points:

  • This setup uses Percona Server for MySQL with the latest mysql client, which is untested, but should be “ok/fine” in most situations
  • If you want to edit the configuration file, you can find it in /etc/mysql/my.cnf
  • If you setup Percona Server to startup at boot time (step 12), give your little server a reboot (type “reboot”) now and check that Percona Server works fine afterwards.
  • Make sure to secure your server properly, especially if it will be exposed on the Internet or if this will be a production server.
    • Secure the initial accounts for your installation.
    • If this will be a production server, you should use a seperate userID to run Percona Server.
    • There are more (OS and otherwise) steps necessary then what it listed here to make your server secure, but those are outside the scope of this article.
  • To check if mysqld is running, use “ps -ef | grep -v grep | grep mysqld” at the Linux command line
  • If you did get a SD card which is larger then 2GB, you can add another partition using fdisk & mkfs.ext4 (comment below if you cannot work out how, and I can post some additional information)

Enjoy!

The post Percona Server on the Raspberry Pi: Your own MySQL Database Server for Under $80 appeared first on MySQL Performance Blog.

Powered by WordPress | Theme: Aeros 2.0 by TheBuckmaker.com