Jan
27
2022
--

Percona Distribution for MySQL Operator Based on Percona Server for MySQL – Alpha Release

Percona Distribution for MySQL Operator

Percona Distribution for MySQL OperatorOperators are a software framework that extends Kubernetes API and enables application deployment and management through the control plane. For such complex technologies as databases, Operators play a crucial role by automating deployment and day-to-day operations. At Percona we have the following production-ready and enterprise-grade Kubernetes Operators for databases:

Today we are glad to announce an alpha version of our new Operator for MySQL. In this blog post, we are going to answer some frequently asked questions.

Why the New Operator?

As mentioned above, our existing operator for MySQL is based on the Percona XtraDB Cluster (PXC). It is feature-rich and provides virtually-synchronous replication by utilizing Galera Write-Sets. Sync replication ensures data consistency and proved itself useful for critical applications, especially on Kubernetes.

But there are two things that we want to address:

  1. Our community and customers let us know that there are numerous use cases where asynchronous replication would be a more suitable solution for MySQL on Kubernetes.
  2. Support Group Replication (GR) – a native way to provide synchronous replication in MySQL without the need to use Galera.

We heard you! That is why our new Operator is going to run Percona Server for MySQL (PS) and provide both regular asynchronous (with semi-sync support) and virtually-synchronous replication based on GR.

What Is the Name of the New Operator?

We will have two Operators for MySQL and follow the same naming as we have for Distributions:

  • Percona Distribution for MySQL Operator – PXC (Existing Operator)
  • Percona Distribution for MySQL Operator – PS (Percona Server for MySQL)

Is It the Successor of the Existing Operator for MySQL?

Not in the short run. We want to provide our users MySQL clusters on Kubernetes with three replication capabilities:

  • Percona XtraDB Cluster
  • Group Replication
  • Regular asynchronous replication with semi-sync support

Will I Be Able to Switch From One Operator to Another?

We are going to provide instructions and tools for migrations through replication or backup and restore. As the underlying implementation is totally different there is no direct, automated path to switch available.

Can I Use the New Operator Now?

Yes, but please remember that it is an alpha version and we do not recommend it for production workloads. 

Our Operator is licensed under Apache 2.0 and can be found in the percona-server-mysql-operator repository on GitHub.

To learn more about our operator please see the documentation.

Quick Deploy

Run these two commands to spin up a MySQL cluster with 3 nodes with asynchronous replication:

$ kubectl apply -f https://raw.githubusercontent.com/percona/percona-server-mysql-operator/main/deploy/bundle.yaml
$ kubectl apply -f https://raw.githubusercontent.com/percona/percona-server-mysql-operator/main/deploy/cr.yaml

In a couple of minutes, the cluster is going to be up and running. Verify:

$ kubectl get ps
NAME       MYSQL   ORCHESTRATOR   AGE
cluster1   ready   ready          6m16s

$ kubectl get pods
NAME                                                READY   STATUS    RESTARTS   AGE
cluster1-mysql-0                                    1/1     Running   0          6m27s
cluster1-mysql-1                                    1/1     Running   1          5m11s
cluster1-mysql-2                                    1/1     Running   1          3m36s
cluster1-orc-0                                      2/2     Running   0          6m27s
percona-server-for-mysql-operator-c8f8dbccb-q7lbr   1/1     Running   0          9m31s

Connect to the Cluster

First, you need to get the root user password, which was automatically generated by the Operator. By default system users’ passwords are stored in cluster1-secrets Secret resource:

$ kubectl get secrets cluster1-secrets -o yaml | grep root | awk '{print $2}' | base64 --decode

Start another container with a MySQL client in it:

$ kubectl run -i --rm --tty percona-client --image=percona:8.0 --restart=Never -- bash -il

Connect to a primary node of our MySQL cluster from this container:

$ mysql -h cluster1-mysql-primary -u root -p
Enter password:
Welcome to the MySQL monitor.  Commands end with ; or \g.
Your MySQL connection id is 138
Server version: 8.0.25-15 Percona Server (GPL), Release 15, Revision a558ec2

Copyright (c) 2009-2021 Percona LLC and/or its affiliates
Copyright (c) 2000, 2021, Oracle and/or its affiliates.
Oracle is a registered trademark of Oracle Corporation and/or its
affiliates. Other names may be trademarks of their respective
owners.

Type 'help;' or '\h' for help. Type '\c' to clear the current input statement.
mysql>

Consult the documentation to learn more about other operational capabilities and options.

What Is Currently Supported?

The following functionality is available in the Operator:

  • Deploy asynchronous and semi-sync replication MySQL clusters with Orchestrator on top of it
  • Expose clusters with regular Kubernetes Services
  • Monitor the cluster with Percona Monitoring and Management
  • Customize MySQL configuration

When Will It Be GA? What Is Going to Be Included?

Our goal is to release the GA version late in Q2 2022. We plan to include the following:

  • Support for both sync and async replication
  • Backups and restores, proxies integration
  • Certifications on various Kubernetes platforms and flavors
  • Deploy and manage MySQL Clusters with PMM DBaaS

Call for Action

Percona Distribution for MySQL Operator – PS just hatched and your feedback is highly appreciated. 

Open a bug or create a Pull Request for a chance to get awesome Percona Swag!

Oct
18
2021
--

Cloud-Native Through the Prism of Percona: Episode 1

Percona Cloud Native Series 1

Percona Cloud Native Series 1The cloud-native landscape matures every day, and new great tools and products continue to appear. We are starting a series of blog posts that are going to focus on new tools in the container and cloud-native world, and provide a holistic view through the prism of Percona products.

In this blog:

  • VMware Tanzu Community edition
  • Data on Kubernetes survey
  • Azure credits for open source projects
  • Percona Distribution for PostgreSQL Operator is GA
  • kube-fledged
  • kubescape
  • m3o – new generation public cloud

VMware Tanzu Community Edition

I personally like this move by VMware to open source Tanzu, the set of products to run and manage Kubernetes clusters and applications. Every time I deploy Amazon EKS I feel like I’ve been punished for something. With VMware Tanzu, deployment of the cluster on Amazon (not EKS) is a smooth experience. It has its own quirks, but still much much better.

Tanzu Community Edition is not only about AWS EKS, but also other public clouds and even local environments with docker.

I also was able to successfully deploy Percona Operators on the Tanzu provisioned cluster. Keep in mind that you need a storage class to be created to run stateful workloads. It can be easily done with Tanzu’s packaging system.

Data on Kubernetes Survey

The Data on Kubernetes (DoK) community does a great job in promoting and evangelizing stateful workloads on Kubernetes. I strongly recommend you check out the DoK 2021 report that was released this week. Key takeaways:

  • Kubernetes is on the rise (nothing new). Half of the respondents run 50% or more of production workloads in k8s.
  • K8S is ready to run stateful workloads – 90% think so, and 70% already run data on k8s.
  • The key benefits of running stateful applications on Kubernetes:
    • Consistency
    • Standardizing
    • Simplify management
    • Enable develop self-service
  • Operators help with:
    • Management
    • Scalability
    • Improve app lifecycle mgmt

There are lots of other interesting data points, I encourage you to go through them.

Azure Credits for Open Source Projects

Percona’s motto is “Keeping Open Source Open”, which is why an announcement from Microsoft to issue Azure credits for open source projects caught our attention. This is a good move from Microsoft helping the open source community to certify products on Azure without spending a buck.

Percona Distribution for PostgreSQL Operator is GA

I cannot miss the opportunity to share with you that Percona’s PostgreSQL Operator has reached the General Availability stage. It was a long journey for us and we were constantly focused on improving the quality of our Operator through introduction of rigorous end-to-end testing. Please read more about this release on the PostgreSQL news mailing list. I also encourage you to look into our GitHub repository and try out the Operator by following these installation instructions.

kube-fledged

Back in the days of my Operations career, I was looking for an easy way to have container images pre-pulled on my Kubernetes nodes. kube-fledged does exactly this. The most common use cases are applications that require rapid start-up or some batch-processing which is fired randomly. If we talk about Percona Operators, then kube-fledged is useful if you scale your databases frequently and don’t want to waste valuable seconds on pulling the image. I have tried it out for Percona Distribution for PostgreSQL Operator and it worked like a charm.

kube-fledged is an operator and it controls which images to pull to the nodes with ImageCache custom resource. I have prepared an

ImageCache

manifest for Percona PostgreSQL Operator as an example – please find it here. This instructs kube-fledge to pull the images that we use in PostgreSQL cluster deployment on all nodes.

kubescape

In every container-related survey, we see security as one of the top concerns. kubescape is a neat tool to test if Kubernetes and apps are deployed securely as defined in National Security Agency (NSA) and Cybersecurity and Infrastructure Security Agency (CICA) Hardening Guidance.

It provides both details and a summary of failures. Here is for example the failure of Resource policy control for containers for default Percona MongoDB Operator deployment:

[control: Resource policies] failed ?
Description: CPU and memory resources should have a limit set for every container to prevent resource exhaustion. This control identifies all the Pods without resource limit definition.
   Namespace default
      Deployment - percona-server-mongodb-operator
      StatefulSet - my-cluster-name-cfg
      StatefulSet - my-cluster-name-rs0
Summary - Passed:3   Excluded:0   Failed:3   Total:6
Remediation: Define LimitRange and ResourceQuota policies to limit resource usage for namespaces or nodes.

It might be a good idea for developers to add kubescape into the CICD pipeline to get additional automated security policy checks.

M3O – New Generation Public Cloud

M3O is an open source AWS alternative built for the next generation of developers. Consume public APIs as simpler programmable building blocks for a 10x better developer experience.” – not my words, but from their website – m3o.com. In a nutshell, it is a set of APIs to greatly simplify the development. In m3o’s GitHub repo there is an example of how to build the Reddit Clone utilizing these APIs only. You can explore available APIs here. As an example I used URL shortener API for this blog post link:

$ curl "https://api.m3o.com/v1/url/Shorten" \
-H "Content-Type: application/json" \
-H "Authorization: Bearer $MICRO_API_TOKEN" \
-d '{
"destinationURL": "https://www.percona.com/blog/cloud-native-series-1"
}'

{"shortURL":"https://m3o.one/u/8FlJbxSfp"}

Looks neat! For now, most of the APIs are free to use, but I assume this is going to change soon once the project gets more traction and grows its user base.

It is also important to note, that this is an open source project, meaning that anyone can deploy their own M3O platform on Kubernetes (yes, k8s again) and have these APIs exposed privately and for free, not as a SaaS offering. See m3o/platform repo for more details and Pulumi example to deploy it.

Complete the 2021 Percona Open Source Data Management Software Survey

Have Your Say!

Aug
16
2021
--

Cisco beefing up app monitoring portfolio with acquisition of Epsagon for $500M

Cisco announced on Friday that it’s acquiring Israeli applications-monitoring startup Epsagon at a price pegged at $500 million. The purchase gives Cisco a more modern microservices-focused component for its growing applications-monitoring portfolio.

The Israeli business publication Globes reported it had gotten confirmation from Cisco that the deal was for $500 million, but Cisco would not confirm that price with TechCrunch.

The acquisition comes on top of a couple of other high-profile app-monitoring deals, including AppDynamics, which the company bought in 2018 for $3.7 billion, and ThousandEyes, which it nabbed last year for $1 billion.

With Epsagon, the company is getting a way to monitor more modern applications built with containers and Kubernetes. Epsagon’s value proposition is a solution built from the ground up to monitor these kinds of workloads, giving users tracing and metrics, something that’s not always easy to do given the ephemeral nature of containers.

As Cisco’s Liz Centoni wrote in a blog post announcing the deal, Epsagon adds to the company’s concept of a full-stack offering in their applications-monitoring portfolio. Instead of having a bunch of different applications monitoring tools for different tasks, the company envisions one that works together.

“Cisco’s approach to full-stack observability gives our customers the ability to move beyond just monitoring to a paradigm that delivers shared context across teams and enables our customers to deliver exceptional digital experiences, optimize for cost, security and performance and maximize digital business revenue,” Centoni wrote.

That experience point is particularly important because when an application isn’t working, it isn’t happening in a vacuum. It has a cascading impact across the company, possibly affecting the core business itself and certainly causing customer distress, which could put pressure on customer service to field complaints, and the site reliability team to fix it. In the worst case, it could result in customer loss and an injured reputation.

If the application-monitoring system can act as an early warning system, it could help prevent the site or application from going down in the first place, and when it does go down, help track the root cause to get it up and running more quickly.

The challenge here for Cisco is incorporating Epsagon into the existing components of the application-monitoring portfolio and delivering that unified monitoring experience without making it feel like a Frankenstein’s monster of a solution globbed together from the various pieces.

Epsagon launched in 2018 and has raised $30 million. According to a report in the Israeli publication, Calcalist, the company was on the verge of a big Series B round with a valuation in the range of $200 million when it accepted this offer. It certainly seems to have given its early investors a good return. The deal is expected to close later this year.

May
20
2021
--

Manage MySQL Users with Kubernetes

Manage MySQL Users with Kubernetes

Manage MySQL Users with Kubernetes
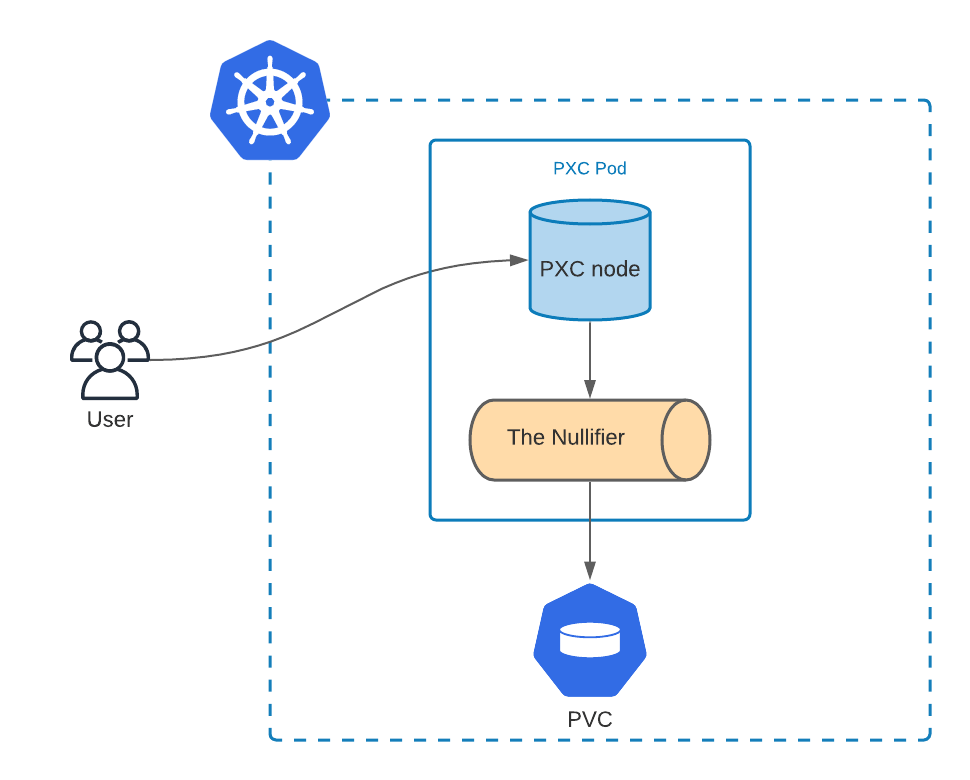
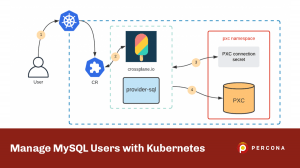
Quite a common request that we receive from the community and customers is to provide a way to manage database users with Operators – both MongoDB and MySQL. Even though we see it as an interesting task, our Operators are mainly a tool to simplify the deployment and management of our software on Kubernetes. Our goal is to provide the database cluster which is ready to host mission-critical applications and deployed with the best practices.

Why Manage Users with Operators?

There are few use cases:

  1. Simplify the CICD pipeline. It is simpler to apply a single manifest than running multiple commands to create the user after the DB is ready.
  2. Give control over DB users to developers or applications, but without providing direct access to the database.
  3. There is an opinion that Kubernetes will transition from container orchestrator to a control plane to manage everything. For some companies, it is a strategy.

We want to have the functionality to provision users with Operators, but it does not seem to be the right solution to do it separately for each Operator. It looks like it can be unified.

What if we take it to another level and create a way to provision users on any database through the Kubernetes control plane? The user has created the MySQL instance on a public cloud through the control plane, so why not create the DB user the same way?

Crossplane.io – A Kubernetes addon that enables users to declaratively describe and provision the infrastructure through the k8s control plane. By design, it is extendable through “providers”. One of them – provider-sql – enables the functionality to manage MySQL and PostgreSQL users (and even databases) through CRDs. Let’s see how to make it work with Percona XtraDB Cluster Operator.

Action

Prerequisites:

  • Kubernetes cluster
  • Percona XtraDB Cluster deployed with Operator (see the docs here)

The goal is to create a Custom Resource (CR) object through Kubernetes API to trigger crossplane.io to create the user on the PXC cluster. As a summary it will look like this:

Manage MySQL Users with Kubernetes

  1. A user creates the CR with the desired user and grants
  2. Crossplane detects it
  3. provider-sql (Crossplane provider) is configured through a Secret object which has the PXC endpoint and root credentials
  4. provider-sql connects to PXC and creates the user

I have placed all the files for this blog post into the public github repository along with the condensed runbook which just lists all the steps. You can find it all here.

Install crossplane

The simplest way is to do it through helm:

kubectl create namespace crossplane
helm repo add crossplane-alpha https://charts.crossplane.io/alpha
helm install crossplane --namespace crossplane crossplane-alpha/crossplane

Other installation methods can be found in crossplane.io documentation.

Install provider-sql

Provider in Crossplane is a concept similar to Terraform’s provider. Everything in crossplane is done through Kubernetes API and that includes the installation of Providers:

$ cat crossplane-provider-sql.yaml
apiVersion: pkg.crossplane.io/v1beta1
kind: Provider
metadata:
  name: provider-sql
spec:
  package: "crossplane/provider-sql:master"

$ kubectl apply -f crossplane-provider-sql.yaml

This is going to install Custom Resource Definitions for provider-sql which is going to be used to manage MySQL users on our PXC cluster. Full docs for provider-sql can be found here, but they are not very detailed.

Almost There

Everything is installed and needs a last configuration touch.

  1. Create a secret which provider-sql is going to use to connect to the MySQL database. I have cluster1 Percona XtraDB cluster deployed in a pxc namespace and the corresponding secret will look like this:
$ cat crossplane-secret.yaml
apiVersion: v1
kind: Secret
metadata:
  name: crossplane-secret
  namespace: pxc
stringData:
  username: root
  password: <root password>
  endpoint: cluster1-haproxy.pxc.svc.cluster.local
  port: "3306"

type: Opaque

You can get the root password from the secret which is created when PXC is deployed through the Operator. Quick way to get it is like this:

$ kubectl get secret -n pxc my-cluster-secrets -o yaml | awk '/root:/ {print $2}' | base64 --decode && echo
<root password>

Crossplane will use the endpoint and port as a MySQL connection string, and username and password to connect to it. Configure provider-sql to get the information from the secret:

$ cat crossplane-mysql-config.yaml
apiVersion: mysql.sql.crossplane.io/v1alpha1
kind: ProviderConfig
metadata:
  name: cluster1-pxc
spec:
  credentials:
    source: MySQLConnectionSecret
    connectionSecretRef:
      namespace: pxc
      name: crossplane-secret

$ kubectl apply -f crossplane-mysql-config.yaml

Let’s verify that configuration is in place:

$ kubectl get providerconfig.mysql.sql.crossplane.io
NAME           AGE
cluster1-pxc   14s

Do It

All set. Crossplane can now connect to the database and create the users. From the Kubernetes and user perspective, it is just creating the custom resources through the control plane API.

Database Creation

$ cat crossplane-db.yaml
apiVersion: mysql.sql.crossplane.io/v1alpha1
kind: Database
metadata:
  name: my-db
spec:
  providerConfigRef:
    name: cluster1-pxc

$ kubectl apply -f crossplane-db.yaml
database.mysql.sql.crossplane.io/my-db created

$ kubectl get database.mysql.sql.crossplane.io
NAME    READY   SYNCED   AGE
my-db   True    True     14s

This created the database on my Percona XtraDB Cluster:

$ mysql -u root -p -h cluster1-haproxy
Server version: 8.0.22-13.1 Percona XtraDB Cluster (GPL), Release rel13, Revision a48e6d5, WSREP version 26.4.3
...
mysql> show databases like 'my-db';
+------------------+
| Database (my-db) |
+------------------+
| my-db            |
+------------------+
1 row in set (0.01 sec)

The DB can be deleted through Kubernetes API as well – just delete the corresponding

database.mysql.sql.crossplane.io

  object.

User Creation

The user needs a password. Password should never be stored as plain text, so let’s put it into a Secret:

$ cat user-secret.yaml
apiVersion: v1
kind: Secret
metadata:
  name: my-user-secret
stringData:
  password: mysuperpass
type: Opaque

We can create the user now:

$ cat crossplane-user.yaml
apiVersion: mysql.sql.crossplane.io/v1alpha1
kind: User
metadata:
  name: my-user
spec:
  providerConfigRef:
    name: cluster1-pxc
  forProvider:
    passwordSecretRef:
      name: my-user-secret
      namespace: default
      key: password
  writeConnectionSecretToRef:
    name: connection-secret
    namespace: default

$ kubectl apply -f crossplane-user.yaml
user.mysql.sql.crossplane.io/my-user created

$ kubectl get user.mysql.sql.crossplane.io
NAME      READY   SYNCED   AGE
my-user   True    True     11s

And add some grants:

$ cat crossplane-grants.yaml
apiVersion: mysql.sql.crossplane.io/v1alpha1
kind: Grant
metadata:
  name: my-grant
spec:
  providerConfigRef:
    name: cluster1-pxc
  forProvider:
    privileges:
      - DROP
      - CREATE ROUTINE
      - EVENT
    userRef:
      name: my-user
    databaseRef:
      name: my-db

$ kubectl apply -f crossplane-grants.yaml
grant.mysql.sql.crossplane.io/my-grant created

$ kubectl get grant.mysql.sql.crossplane.io
NAME       READY   SYNCED   AGE   ROLE      DATABASE   PRIVILEGES
my-grant   True    True     7s    my-user   my-db      [DROP CREATE ROUTINE EVENT]

Verify that the user is there:

mysql> show grants for 'my-user';
+-----------------------------------------------------------------+
| Grants for my-user@%                                            |
+-----------------------------------------------------------------+
| GRANT USAGE ON *.* TO `my-user`@`%`                             |
| GRANT DROP, CREATE ROUTINE, EVENT ON `my-db`.* TO `my-user`@`%` |
+-----------------------------------------------------------------+
2 rows in set (0.00 sec)

Keeping the State

Kubernetes is declarative and its controllers always do their best to keep the declared configuration and real state in sync. It means that if you are going to delete the user manually from the database (not through Kubernetes API), on the next pass of a reconcile loop Crossplane will sync the state and recreate the user and grants again.

Conclusion

Some functionality in one database engine differs a lot from the other, but sometimes there is a pattern. User creation is one of these patterns that can be unified across multiple database engines. Luckily Cloud Native Foundation landscape is huge and consists of a lot of building blocks which when used together can deliver wonderful infrastructures or applications.

This blog post shows that the community might have already found a better solution to the problem and re-inventing it might be a waste of time.

Extending crossplane.io providers to support other database engines (like MongoDB) is a challenge but can be solved. We are drafting a proposal and will work with our teams and community to deliver this.

May
18
2021
--

Styra, the startup behind Open Policy Agent, nabs $40M to expand its cloud-native authorization tools

As cloud-native apps continue to become increasingly central to how organizations operate, a startup founded by the creators of a popular open-source tool to manage authorization for cloud-native application environments is announcing some funding to expand its efforts at commercializing the opportunity.

Styra, the startup behind Open Policy Agent, has picked up $40 million in a Series B round of funding led by Battery Ventures. Also participating are previous backers A. Capital, Unusual Ventures and Accel; and new backers CapitalOne Ventures, Citi Ventures and Cisco Investments. Styra has disclosed CapitalOne is also one of its customers, along with e-commerce site Zalando and the European Patent Office.

Styra is sitting on the classic opportunity of open source technology: scale and demand.

OPA — which can be used across Kubernetes, containerized and other environments — now has racked up some 75 million downloads and is adding some 1 million downloads weekly, with Netflix, Capital One, Atlassian and Pinterest among those that are using OPA for internal authorization purposes. The fact that OPA is open source is also important:

“Developers are at the top of the food chain right now,” CEO Bill Mann said in an interview, “They choose which technology on which to build the framework, and they want what satisfies their requirements, and that is open source. It’s a foundational change: if it isn’t open source it won’t pass the test.”

But while some of those adopting OPA have hefty engineering teams of their own to customize how OPA is used, the sheer number of downloads (and potential active users stemming from that) speak to the opportunity for a company to build tools to help manage that and customize it for specific use cases in cases where those wanting to use OPA may lack the resources (or appetite) to build and scale custom implementations themselves.

As with many of the enterprise startups getting funded at the moment, Styra has proven itself in particular over the last year, with the switch to remote work, workloads being managed across a number of environments, and the ever-persistent need for better security around what people can and should not be using. Authorization is a particularly acute issue when considering the many access points that need to be monitored: as networks continue to grow across multiple hubs and applications, having a single authorization tool for the whole stack becomes even more important.

Styra said that some of the funding will be used to continue evolving its product, specifically by creating better and more efficient ways to apply authorization policies by way of code; and by bringing in more partners to expand the scope of what can be covered by its technology.

“We are extremely impressed with the Styra team and the progress they’ve made in this dynamic market to date,” said Dharmesh Thakker, a general partner at Battery Ventures. “Everyone who is moving to cloud, and adopting containerized applications, needs Styra for authorization—and in the light of today’s new, remote-first work environment, every enterprise is now moving to the cloud.” Thakker is joining the board with this round.

May
10
2021
--

Point-in-Time Recovery for MongoDB on Kubernetes

point in time recovery mongodb

point in time recovery mongodb
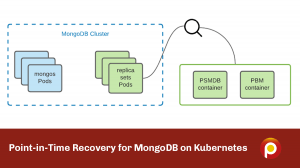
Running MongoDB in Kubernetes with Percona Operator is not only simple but also by design provides a highly available MongoDB cluster suitable for mission-critical applications. In the latest 1.8.0 version, we add a feature that implements Point-in-time recovery (PITR). It allows users to store Oplog on an external S3 bucket and to perform recovery to a specific date and time once needed. The main value of this approach is a significantly lower Recovery Time Objective (RTO) and Recovery Point Objective (RPO).

In this blog post, we will look into how we delivered this feature and review some architectural decisions.

Internals

For full backups and PITR features, the Operator relies on Percona Backup for MongoDB (PBM), which by design supports storing operations logs (oplogs) on S3-compatible storage. We run PBM as a sidecar container in replica sets Pods, including Config Server Pods. So each replica set has two containers from the very beginning – Percona Server for MongoDB (PSMDB) and Percona Backup for MongoDB.

While PBM is a great tool, it comes with some limitations that we needed to keep in mind when implementing the PITR feature.

One Bucket

If PITR is enabled, PBM stores backups on S3 storage in a chained mode: Oplogs are stored right after the full backup and require it. PBM stores metadata about the backups in the MongoDB cluster itself and creates a copy on S3 to maintain the full visibility of the state of backups and operation logs.

When a user wants to recover to a specific date and time, PBM figures out which full backup to use, recovers from it, and applies the oplogs.

If the user decides to use multiple S3 buckets to store backups, it means that oplogs are also scattered across these buckets. This complicates the recovery process because PBM only knows about the last S3 bucket used to store the full backup.

To simplify things and to avoid these split-brain situations with multiple buckets we made the following design decisions:

  • Do not enable the PITR feature in the user-specified multiple buckets in
    backup.storages

    section. This should cover most of the cases. We throw an error if the user tries that:

"msg":"Point-in-time recovery can be enabled only if one bucket is used in spec.backup.storages"

  • There are still cases where users can get into the situation with multiple buckets (ex. disable PITR and enable it again with another bucket).
    • That is why to recover from the backup we request the user to specify the
      backupName

      (

      psmdb-backup

      Custom Resource name) in the

      recover.yaml

      manifest. From this CR we get the storage and PBM fetches the oplogs which follow the full backup.

The obvious question is: why can’t the Operator handle the logic and somehow store metadata from multiple buckets?

There are several answers here:

  1. Bucket configurations can change during a cluster’s lifecycle and keeping all this data is possible, but the data may become obsolete over time. Also, our Operator is stateless and we want to keep it that way.
  2. We don’t want to bring this complexity into the Operator and are assessing the feasibility of adding this functionality into PBM instead (K8SPSMDB-460).

Full Backup Needed

We mentioned before that Oplogs require full backups. Without a full backup, PBM will not start uploading oplogs and the Operator will throw the following error:

"msg":"Point-in-time recovery will work only with full backup. Please create one manually or wait for scheduled backup to be created (if configured).

There are two cases when this can happen:

  1. User enables PITR for the cluster
  2. User recovers from backup

In this release, we decided not to create the full backup automatically, but leave it to the user or backup schedule. We might introduce the flag in the following releases which would allow users to configure this behavior, but for now, we decided that current primitives are enough to automate the full backup creation. 

10 Minutes RPO

Right now PBM uploads oplogs to the S3 bucket every 10 minutes. This time span is not configurable and hardcoded for now. What it means to the user is that a Recovery Point Objective (RPO) can be as much as ten minutes. 

This is going to be improved in the following releases of Percona Backup for MongoDB and captured in PBM-543 JIRA issue. Once it is there, the user would be able to control the period between Oplog uploads with

spec.backup.pitr.timeBetweenUploads

in

cr.yaml

.

Which Backups do I Have?

So the user has Full backups and PITR enabled. PBM has a nice feature that shows all the backups and Oplog (PITR) time frames:

$ pbm list

Backup snapshots:
     2020-12-10T12:19:10Z [complete: 2020-12-10T12:23:50]
     2020-12-14T10:44:44Z [complete: 2020-12-14T10:49:03]
     2020-12-14T14:26:20Z [complete: 2020-12-14T14:34:39]
     2020-12-17T16:46:59Z [complete: 2020-12-17T16:51:07]
PITR <on>:
     2020-12-14T14:26:40 - 2020-12-16T17:27:26
     2020-12-17T16:47:20 - 2020-12-17T16:57:55

But in Operator the user can see full backup details, but cannot see the Oplog information yet without going into the backup container manually:

$ kubectl get psmdb-backup backup2 -o yaml
…
status:
  completed: "2021-05-05T19:27:36Z"
  destination: "2021-05-05T19:27:11Z"
  lastTransition: "2021-05-05T19:27:36Z"
  pbmName: "2021-05-05T19:27:11Z"
  s3:
    bucket: my-bucket
    credentialsSecret: s3-secret
    endpointUrl: https://storage.googleapis.com
    region: us-central-1

The obvious idea is to somehow store this information in

psmdb-backup

Custom Resource but to do that we need to keep it updated. Updating hundreds of these objects all the time in a reconcile loop might result in pressure on the Operator and even Kubernetes API. We are still assessing different options here.

Conclusion

Point-in-time recovery is an important feature for Percona Operator for MongoDB as it reduces both RTO and RPO. The feature was present in PBM for some time already and was battle-tested in multiple production deployments. With Operator we want to reduce the manual burden to a minimum and automate day-2 operations as much as possible. Here is a quick summary of what is coming in the following releases of the Operator related to PITR:

  • Reduce RPO even more with configurable Oplogs upload period (PBM-543, K8SPSMDB-388)
  • Take full backup automatically if PITR is enabled (K8SPSMDB-460)
  • Provide users the visibility into available Oplogs time frames (K8SPSMDB-461)

Our roadmap is available publicly here and we would be curious to learn more about your ideas. If you are willing to contribute a good starting point would be CONTRIBUTING.md in our Github repository. It has all the details about how to contribute code, submit new ideas, and report a bug. A good place to ask questions is our Community Forum, where anyone can freely share their thoughts and suggestions regarding Percona software.

Apr
20
2021
--

Change Storage Class on Kubernetes on the Fly

Change Storage Class Kubernetes

Change Storage Class KubernetesPercona Kubernetes Operators support various options for storage: Persistent Volume (PV), hostPath, ephemeral storage, etc. In most of the cases, PVs are used, which are provisioned by the Operator through Storage Classes and Persistent Volume Claims.

Storage Classes define the underlying volume type that should be used (ex. AWS, EBS, gp2, or io1), file system (xfs, ext4), and permissions. In various cases, cluster administrators want to change the Storage Class for already existing volumes:

  • DB cluster is underutilized and it is a good cost-saving when switching from io1 to gp2
  • The other way – DB cluster is saturated on IO and it is required to upsize the volumes
  • Switch the file system for better performance (MongoDB is much better with xfs)

In this blog post, we will show what the best way is to change the Storage Class with Percona Operators and not introduce downtime to the database. We will cover the change in the Storage Class, but not the migration from PVC to other storage types, like hostPath.

Changing Storage Class on Kubernetes

Prerequisites:

Goal:

  • Change the storage from pd-standard to pd-ssd without downtime for PXC.

Planning

The steps we are going to take are the following:

  1. Create a new Storage class for pd-ssd volumes
  2. Change the
    storageClassName

    in Custom Resource (CR) 

  3. Change the
    storageClassName

    in the StatefulSet

  4. Scale up the cluster (optional, to avoid performance degradation)
  5. Reprovision the Pods one by one to change the storage
  6. Scale down the cluster


Register for Percona Live ONLINE
A Virtual Event about Open Source Databases


Execution

Create the Storage Class

By default, standard Storage Class is already present in GKE, we need to create the new

StorageClass

 for ssd:

$ cat pd-ssd.yaml
apiVersion: storage.k8s.io/v1
kind: StorageClass
metadata:
  name: ssd
provisioner: kubernetes.io/gce-pd
parameters:
  type: pd-ssd
volumeBindingMode: Immediate
reclaimPolicy: Delete

$ kubectl apply -f pd-ssd.yaml

The new Storage Class will be called

ssd

and will provision the volumes of

type: pd-ssd

.

Change the storageClassName in Custom Resource

We need to change the configuration for Persistent Volume Claims in our Custom Resource. The variable we look for is

storageClassName

and it is located under

spec.pxc.volumeSpec.persistentVolumeClaim

.

spec:
  pxc:
    volumeSpec:
      persistentVolumeClaim:
-       storageClassName: standard
+       storageClassName: ssd

Now apply new cr.yaml:

$ kubectl apply -f deploy/cr.yaml

Change the storageClassName in the StatefulSet

StatefulSets are almost immutable and when you try to edit the object you get the warning:

# * spec: Forbidden: updates to statefulset spec for fields other than 'replicas', 'template', and 'updateStrategy' are forbidden

We will rely on the fact that the operator controls the StatefulSet. If we delete it, the Operator is going to recreate it with the last applied configuration. For us, it means – with the new storage class. But the deletion of the StatefulSet leads to Pods termination, but our goal is 0 downtime. To get there, we will delete the set, but keep the Pods running. It can be done with –cascade flag:

$ kubectl delete sts cluster1-pxc --cascade=orphan

As a result, the Pods are up and the Operator recreated the StatefulSet with new storageClass:

$ kubectl get sts | grep cluster1-pxc
cluster1-pxc       3/3      8s

Change Storage Class on Kubernetes

Scale up the Cluster (Optional)

Changing the storage type would require us to terminate the Pods, which decreases the computational power of the cluster and might cause performance issues. To improve performance during the operation we are going to changing the size of the cluster from 3 to 5 nodes:

spec:
  pxc:
-   size: 3
+   size: 5

$ kubectl apply -f deploy/cr.yaml

As long as we have changed the StatefulSet already, new PXC Pods will be provisioned with the volumes backed by the new

StorageClass

:

$ kubectl get pvc
datadir-cluster1-pxc-0   Bound    pvc-6476a94c-fa1b-45fe-b87e-c884f47bd328   6Gi        RWO            standard       78m
datadir-cluster1-pxc-1   Bound    pvc-fcfdeb71-2f75-4c36-9d86-8c68e508da75   6Gi        RWO            standard       76m
datadir-cluster1-pxc-2   Bound    pvc-08b12c30-a32d-46a8-abf1-59f2903c2a9e   6Gi        RWO            standard       64m
datadir-cluster1-pxc-3   Bound    pvc-b96f786e-35d6-46fb-8786-e07f3097da02   6Gi        RWO            ssd            69m
datadir-cluster1-pxc-4   Bound    pvc-84b55c3f-a038-4a38-98de-061868fd207d   6Gi        RWO            ssd           68m

Reprovision the Pods One by One to Change the Storage

This is the step where underlying storage is going to be changed for the database Pods.

Delete the PVC of the Pod that you are going to reprovision. Like for Pod

cluster1-pxc-2

the PVC is called

datadir-cluster1-pxc-2

:

$ kubectl delete pvc datadir-cluster1-pxc-2

The PVC will not be deleted right away as there is a Pod using it. To proceed, delete the Pod:

$ kubectl delete pod cluster1-pxc-2

The Pod will be deleted along with the PVCs. The StatefulSet controller will notice that the pod is gone and will recreate it along with the new PVC of a new Storage Class:

$ kubectl get pods
...
cluster1-pxc-2                                     0/3     Init:0/1   0          7s

$ kubectl get pvc datadir-cluster1-pxc-2
NAME                     STATUS   VOLUME                                     CAPACITY   ACCESS MODES   STORAGECLASS   AGE
…
datadir-cluster1-pxc-2   Bound    pvc-08b12c30-a32d-46a8-abf1-59f2903c2a9e   6Gi        RWO            ssd      10s

The STORAGECLASS column indicates that this PVC is of type ssd.

You might face the situation that the Pod is stuck in a pending state with the following error:

  Warning  FailedScheduling  63s (x3 over 71s)  default-scheduler  persistentvolumeclaim "datadir-cluster1-pxc-2" not found

It can happen due to the race condition: Pod was created when old PVC was terminating, and when the Pod is ready to start the PVC is already gone. Just delete the Pod again, so that the PVC is recreated.

Once the Pod is up, the State Snapshot Transfer kicks in and the data is synced from other nodes. It might take a while if your cluster holds lots of data and is heavily utilized. Please wait till the node is fully up and running, sync is finished, and only then proceed to the next Pod.

Scale Down the Cluster

Once all the Pods are running on the new storage it is time to scale down the cluster (if it was scaled up):

spec:
  pxc:
-   size: 5
+   size: 3


$ kubectl apply -f deploy/cr.yaml

Do not forget to clean up the PVCs for nodes 4 and 5. And done!

Conclusion

Changing the storage type is a simple task on the public clouds, but its simplicity is not synchronized yet with Kubernetes capabilities. Kubernetes and Container Native landscape is evolving and we hope to see this functionality soon. The way of changing Storage Class described in this blog post can be applied to both the Percona Operator for PXC and Percona Operator for MongoDB. If you have ideas on how to automate this and are willing to collaborate with us on the implementation, please submit the Issue to our public roadmap on Github.

Apr
07
2021
--

Percona Kubernetes Operators and Azure Blob Storage

Percona Kubernetes Operators and Azure Blob Storage

Percona Kubernetes Operators allow users to simplify deployment and management of MongoDB and MySQL databases on Kubernetes. Both operators allow users to store backups on S3-compatible storage and leverage Percona XtraBackup and Percona Backup for MongoDB to deliver backup and restore functionality. Both backup tools do not work with Azure Blob Storage, which is not compatible with the S3 protocol.

This blog post explains how to run Percona Kubernetes Operators along with MinIO Gateway on Azure Kubernetes Service (AKS) and store backups on Azure Blob Storage:

Percona Kubernetes Operators along with MinIO Gateway

Setup

Prerequisites:

  • Azure account
  • Azure Blob Storage account and container (the Bucket in AWS terms)
  • Cluster deployed with Azure Kubernetes Service (AKS)

Deploy MinIO Gateway

I have prepared the manifest to deploy the MinIO gateway to Kubernetes, you can find them in the Github repo here.

First, create a separate namespace:

kubectl create namespace minio-gw

Create the secret which contains credentials for Azure Blob Storage:

$ cat minio-secret.yaml
apiVersion: v1
kind: Secret
metadata:
&nbsp;&nbsp;name: minio-secret
stringData:
&nbsp;&nbsp;AZURE_ACCOUNT_NAME: Azure_account_name
&nbsp;&nbsp;AZURE_ACCOUNT_KEY: Azure_account_key

$ kubectl -n minio-gw apply -f minio-secret.yaml

Apply

minio-gateway.yaml

 from the repository. This manifest does two things:

  1. Creates MinIO Pod backed by Deployment object
  2. Exposes this Pod on port 9000 as a ClusterIP through a Service object
$ kubectl -n minio-gw apply -f blog-data/operators-azure-blob/minio-gateway.yaml

It is also possible to use Helm Charts and deploy the Gateway with MinIO Operator. You can read more about it here. Running a MinIO Operator might be a good choice, but it is an overkill for this blog post.

Deploy PXC

Get the code from Github:

git clone -b v1.7.0 https://github.com/percona/percona-xtradb-cluster-operator

Deploy the bundle with Custom Resource Definitions:

cd percona-xtradb-cluster-operator 
kubectl apply -f deploy/bundle.yaml

Create the Secret object for backup. You should use the same Azure Account Name and Key that you used to setup MinIO:

$ cat deploy/backup-s3.yam
apiVersion: v1
kind: Secret
metadata:
  name: azure-backup
type: Opaque
data:
  AWS_ACCESS_KEY_ID: BASE64_ENCODED_AZURE_ACCOUNT_NAME
  AWS_SECRET_ACCESS_KEY: BASE64_ENCODED_AZURE_ACCOUNT_KEY

Add storage configuration into

cr.yaml

 under

spec.backup.storages

.

storages:
  azure-minio:
    type: s3
    s3:
      bucket: test-azure-container
      credentialsSecret: azure-backup
      endpointUrl: http://minio-gateway-svc.minio-gw:9000

  • bucket

    is the container created on Azure Blob Storage.

  • endpointUrl

    must point to the MinIO Gateway service that was created in the previous section.

Deploy the database cluster:

$ kubectl apply -f deploy/cr.yaml

Read more about the installation of the Percona XtraDB Cluster Operator in our documentation.

Take Backups and Restore

To take the backup or restore, follow the regular approach by creating corresponding

pxc-backup

or

pxc-restore

Custom Resources in Kubernetes. For example, to take the backup I use the following manifest:

$ cat deploy/backup/backup.yaml
apiVersion: pxc.percona.com/v1
kind: PerconaXtraDBClusterBackup
metadata:
  name: backup1
spec:
  pxcCluster: cluster1
  storageName: azure-minio

This creates the Custom Resource object

pxc-backup

and the Operator uploads the backup to the Container in my Storage account:

Read more about backup and restore functionality in the Percona Kubernetes Operator for Percona XtraDB Cluster documentation.

Conclusion

Even though Azure Blob Storage is not S3-compatible, Cloud Native landscape provides production-ready tools for seamless integration. MinIO Gateway will work for both Percona Kubernetes Operators for MySQL and MongoDB, enabling S3-like backup and restore functionality.

The Percona team is committed to delivering smooth integration for its software products for all major clouds. Adding support for Azure Blob Storage is on the roadmap of Percona XtraBackup and Percona Backup for MongoDB, so as the certification on Azure Kubernetes Service for both operators.

Apr
01
2021
--

Infinitely Scalable Storage with High Compression Feature

Infinitely Scalable Storage with High Compression Feature

Infinitely Scalable Storage with High Compression Feature
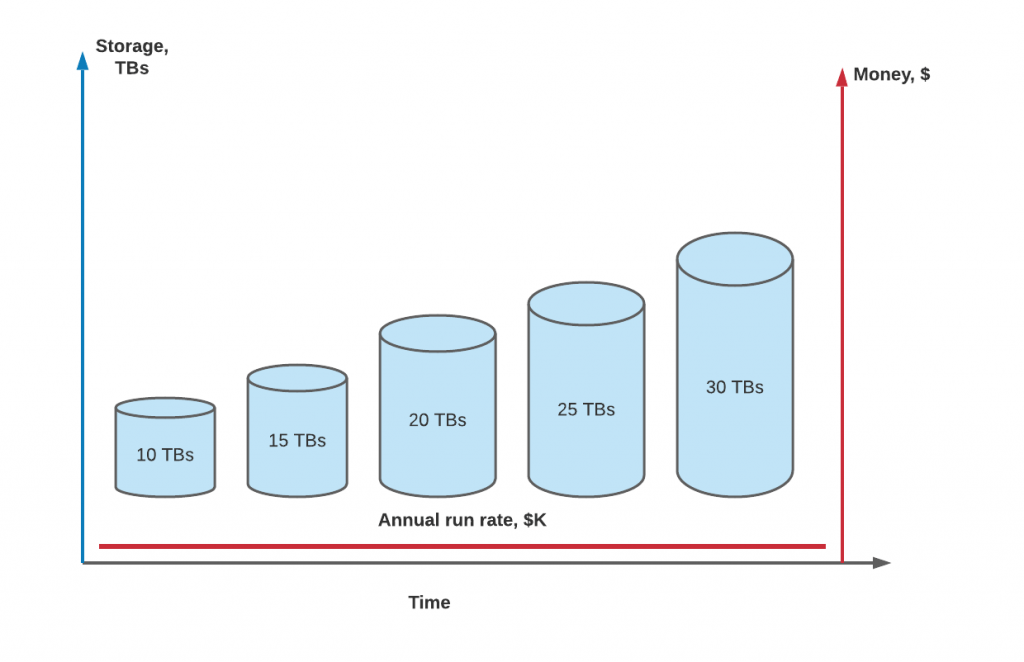
It is no secret that compute and storage costs are the main drivers of cloud bills. Migration of data from the legacy data center to the cloud looks appealing at first as it significantly reduces capital expense (CapEx) and keeps operational expenses (OpEx) under control. But once you see the bill, the lift and shift project does not look that promising anymore. See Percona’s recent open source survey which shows that many organizations saw an unexpected growth around cloud and data.

Storage growth is an organic process for the expanding business: more customers store more data, and more data needs more backups and disaster recovery storage for low RTO.

Today, the Percona Innovation Team, which is part of the Engineering organization, is proud to announce a new feature – High Compression. With this feature enabled, your MySQL databases will have infinite storage at zero cost.

The Problem

Our research team was digging into the problem of storage growth. They have found that the storage growth of a successful business inevitably leads to the increase of the cloud bill. After two years of research we got the data we need and the problem is now clear, and you can see it on the chart below:

The correlation is clearly visible – the more data you have, the more you pay.

The Solution

Once our Innovation Team received the data, we started working day and night on the solution. The goal was to change the trend and break the correlation. That is how after two years, we are proud to share with the community the High Compression feature. You can see the comparison of the storage costs with and without this new feature below:

Option 100 TB AWS EBS 100 TB AWS S3 for backups 100 TB AWS EBS + High compression 100 TB AWS S3 for backups + High Compression
Annual run rate

$120,000

$25,200

$1.2

< $1

As you see it is a 100,000x difference! What is more interesting, the cost of the storage with the High Compression feature enabled always stays flat and the chart now looks like this:

Theory

Not many people know, but data on disks is stored as bits, which are 0s and 1s. They form the binary sequences which are translated into normal data.

After thorough research, we came to the conclusion that we can replace the 1s with 0s easily. The formula is simple:

f(1) = 0

So instead of storing all these 1s, our High Compression feature stores zeroes only:


Implementation

The component which does the conversion is called the Nullifier, and every bit of data goes through it. We are first implementing this feature in Percona Operator for Percona XtraDB Cluster and below is the technical view of how it is implemented in Kubernetes:

As you see, all the data written by the user (all Insert or Update statements) goes through the Nullifier first, and only then are stored on the Persistent Volume Claim (PVC). With the High Compression feature enabled, the size of the PVC can be always 1 GB.

Percona is an open source company and we are thrilled to share our code with everyone. You can see the Pull Request for the High Compression feature here. As you see in the PR, our feature provides the Nullifier through the underestimated and very powerful Blackhole engine.

  if [ "$HIGH_COMPRESSION" == 'yes' ]; then
        sed -r "s|^[#]?default_storage_engine=.*$|default_storage_engine=BLACKHOLE|" ${CFG} 1<>${CFG}
        grep -E -q "^[#]?pxc_strict_mode" "$CFG" || sed '/^\[mysqld\]/a pxc_strict_mode=PERMISSIVE\n' ${CFG} 1<>${CFG}
    fi

The High Compression feature will be enabled by default starting from PXC Operator version 1.8.0, but we have added the flag into

cr.yaml

to disable this feature if needed:

spec.pxc.highCompression: true

.

Backups and with the High Compression feature are blazing fast and take seconds with any amount of data. The challenge our Engineering team is working on now is recovery. The Nullifier does the job, but recovering the data is hard. We are confident that De-Nullifier will be released in 1.8.0 as well.

Conclusion

Percona is spearheading innovation in the database technology field. The High Compression feature solves the storage growth problem and as a result, reduces the cloud bill significantly. The release of the Percona Kubernetes Operator for Percona XtraDB Cluster 1.8.0 is planned for mid-April, but this feature is already available in Tech Preview.

As a quick peek at our roadmap, we are glad to share that the Innovation Team has already started working on the High-Density feature, which will drastically reduce the compute footprint required to run MySQL databases.

Mar
22
2021
--

Storing Kubernetes Operator for Percona Server for MongoDB Secrets in Github

storing kubernetes MongoDB secrets github

storing kubernetes MongoDB secrets github
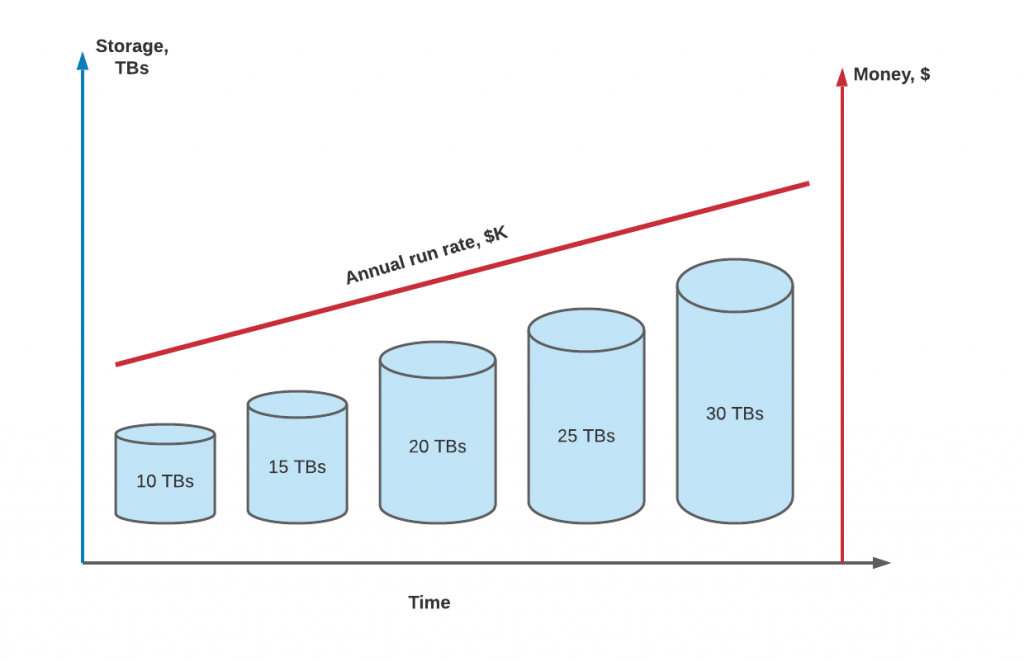
More and more companies are adopting GitOps as the way of implementing Continuous Deployment. Its elegant approach built upon a well-known tool wins the hearts of engineers. But even if your git repository is private, it’s strongly discouraged to store keys and passwords in unencrypted form.

This blog post will show how easy it is to use GitOps and keep Kubernetes secrets for Percona Kubernetes Operator for Percona Server for MongoDB securely in the repository with Sealed Secrets or Vault Secrets Operator.

Sealed Secrets

Prerequisites:

  • Kubernetes cluster up and running
  • Github repository (optional)

Install Sealed Secrets Controller

Sealed Secrets rely on asymmetric cryptography (which is also used in TLS), where the private key (which in our case is stored in Kubernetes) can decrypt the message encrypted with the public key (which can be stored in public git repository safely). To make this task easier, Sealed Secrets provides the kubeseal tool, which helps with the encryption of the secrets.

Install kubeseal operator into your Kubernetes cluster:

kubectl apply -f https://github.com/bitnami-labs/sealed-secrets/releases/download/v0.15.0/controller.yaml

It will install the controller into the kube-system namespace and provide the Custom Resource Definition

sealedsecrets.bitnami.com

. All resources in Kubernetes with

kind: SealedSecrets

will be handled by this Operator.

Download the kubeseal binary:

wget https://github.com/bitnami-labs/sealed-secrets/releases/download/v0.15.0/kubeseal-linux-amd64 -O kubeseal
sudo install -m 755 kubeseal /usr/local/bin/kubeseal

Encrypt the Keys

In this example, I intend to store important secrets of the Percona Kubernetes Operator for Percona Server for MongoDB in git along with my manifests that are used to deploy the database.

First, I will seal the secret file with system users, which is used by the MongoDB Operator to manage the database. Normally it is stored in deploy/secrets.yaml.

kubeseal --format yaml < secrets.yaml  > blog-data/sealed-secrets/mongod-secrets.yaml

This command creates the file with encrypted contents, you can see it in the blog-data/sealed-secrets repository here. It is safe to store it publicly as it can only be decrypted with a private key.

Executing

kubectl apply -f blog-data/sealed-secrets/mongod-secrets.yaml

does the following:

  1. A sealedsecrets custom resource (CR) is created. You can see it by executing
    kubectl get sealedsecrets

    .

  2. The Sealed Secrets Operator receives the event that a new sealedsecrets CR is there and decrypts it with the private key.
  3. Once decrypted, a regular Secrets object is created which can be used as usual.

$ kubectl get sealedsecrets
NAME               AGE
my-secure-secret   20m

$ kubectl get secrets my-secure-secret
NAME               TYPE     DATA   AGE
my-secure-secret   Opaque   10     20m

Next, I will also seal the keys for my S3 bucket that I plan to use to store backups of my MongoDB database:

kubeseal --format yaml < backup-s3.yaml  > blog-data/sealed-secrets/s3-secrets.yaml
kubectl apply -f blog-data/sealed-secrets/s3-secrets.yaml

Vault Secrets Operator

Sealed Secrets is the simplest approach, but it is possible to achieve the same result with HashiCorp Vault and Vault Secrets Operator. It is a more advanced, mature, and feature-rich approach.

Prerequisites:

Vault Secrets Operator also relies on Custom Resource, but all the keys are stored in HashiCorp Vault:

Preparation

Create a policy on the Vault for the Operator:

cat <<EOF | vault policy write vault-secrets-operator -
path "kvv2/data/*" {
  capabilities = ["read"]
}
EOF

The policy might look a bit differently, depending on where your secrets are.

Create and fetch the token for the policy:

$ vault token create -period=24h -policy=vault-secrets-operator

Key                  Value                                                                                                                                                                                        
---                  -----                                                                                               
token                s.0yJZfCsjFq75GiVyKiZgYVOm
...

Write down the token, as you will need it in the next step.

Create the Kubernetes Secret so that the Operator can authenticate with the Vault:

export VAULT_TOKEN=s.0yJZfCsjFq75GiVyKiZgYVOm
export VAULT_TOKEN_LEASE_DURATION=86400

cat <<EOF | kubectl apply -f -
apiVersion: v1
kind: Secret
metadata:
  name: vault-secrets-operator
type: Opaque
data:
  VAULT_TOKEN: $(echo -n "$VAULT_TOKEN" | base64)
  VAULT_TOKEN_LEASE_DURATION: $(echo -n "$VAULT_TOKEN_LEASE_DURATION" | base64)
EOF

Deploy Vault Secrets Operator

It is recommended to deploy the Operator with Helm, but before we need to create the values.yaml file to configure the operator.

environmentVars:
  - name: VAULT_TOKEN
    valueFrom:
      secretKeyRef:
        name: vault-secrets-operator
        key: VAULT_TOKEN
  - name: VAULT_TOKEN_LEASE_DURATION
    valueFrom:
      secretKeyRef:
        name: vault-secrets-operator
        key: VAULT_TOKEN_LEASE_DURATION
vault:
  address: "http://vault.vault.svc:8200"

Environment variables are pointing to the Secret that was created in the previous chapter to authenticate with Vault. We also need to provide the Vault address for the Operator to retrieve the secrets.

Now we can deploy the Vault Secrets Operator:

helm repo add ricoberger https://ricoberger.github.io/helm-charts
helm repo update

helm upgrade --install vault-secrets-operator ricoberger/vault-secrets-operator -f blog-data/sealed-secrets/values.yaml

Give me the Secret

I have a key created in my HashiCorp Vault:

$ vault kv get kvv2/mongod-secret
…
Key                                 Value
---                                 -----                                                                                                                                                                         
MONGODB_BACKUP_PASSWORD             <>
MONGODB_CLUSTER_ADMIN_PASSWORD      <>
MONGODB_CLUSTER_ADMIN_USER          <>
MONGODB_CLUSTER_MONITOR_PASSWORD    <>
MONGODB_CLUSTER_MONITOR_USER        <>                                                                                                                                                               
MONGODB_USER_ADMIN_PASSWORD         <>
MONGODB_USER_ADMIN_USER             <>

It is time to create the secret out of it. First, we will create the Custom Resource object of

kind: VaultSecret

.

$ cat blog-data/sealed-secrets/vs.yaml
apiVersion: ricoberger.de/v1alpha1
kind: VaultSecret
metadata:
  name: my-secure-secret
spec:
  path: kvv2/mongod-secret
  type: Opaque

$ kubectl apply -f blog-data/sealed-secrets/vs.yaml

The Operator will connect to HashiCorp Vault and create regular Secret object automatically:

$ kubectl get vaultsecret
NAME               SUCCEEDED   REASON    MESSAGE              LAST TRANSITION   AGE
my-secure-secret   True        Created   Secret was created   47m               47m

$ kubectl get secret  my-secure-secret
NAME               TYPE     DATA   AGE
my-secure-secret   Opaque   7      47m

Deploy MongoDB Cluster

Now that the secrets are in place, it is time to deploy the Operator and the DB cluster:

kubectl apply -f blog-data/sealed-secrets/bundle.yaml
kubectl apply -f blog-data/sealed-secrets/cr.yaml

The cluster will be up in a minute or two and use secrets we deployed.

By the way, my cr.yaml deploys MongoDB cluster with two shards. Multiple shards support was added in version 1.7.0of the Operator – I encourage you to try it out. Learn more about it here: Percona Server for MongoDB Sharding.

Powered by WordPress | Theme: Aeros 2.0 by TheBuckmaker.com